Final Exam
Dreamweaver
In this final exam
exercise, you will be creating the site called the “LMC Auto Body
Specialist”.
You will be using the
centered- two column page layout using DIV tag layers for the site. You will also be creating a vertical
navigation menu using the unordered list.
1. Create a “layout”
HTML document.
2. Create an external
cascading style sheet (CSS) and attach the file to the HTML document.
3. Insert DIV tag layer
containers.
4. Configure the
formatting and layout style rules for the DIV tag layers.
5. Create the vertical
navigation menu using the unordered list.
6. Use the CSS Box Model technique in adding margins and padding to the DIV tag
layers and content elements.
7. Insert the image and
text content elements into the DIV layers.
8. Add and apply the
layout and format style rules for the content elements.
9. Test the web site by
verifying the links are working in the navigation menu.
|
Final Exam |
Points |
|
1. PART 1: Create the centered-two column “layout” page. |
35 |
|
2. PART 2: Add the content in the “layout” page. |
35
|
|
3. PART 3: Create all the pages for the site. |
45 |
|
4. PART 4: Test the web site |
10 |
|
Total |
125 |
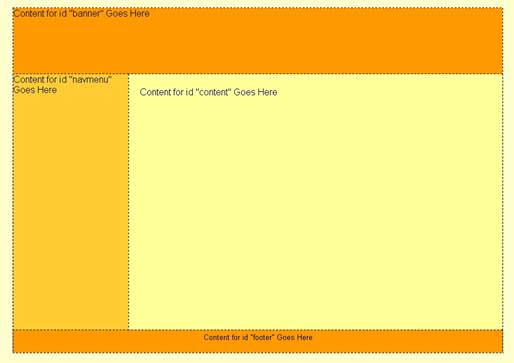
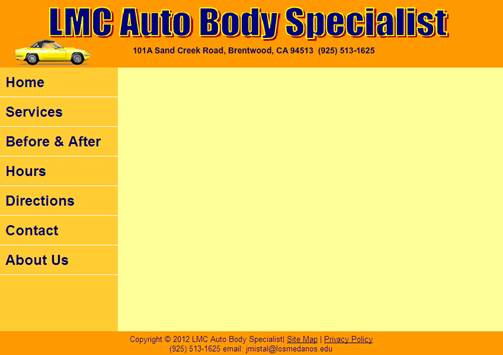
Desired Output:
Below is the sample output page for
index.html.

Below is the wireframe:
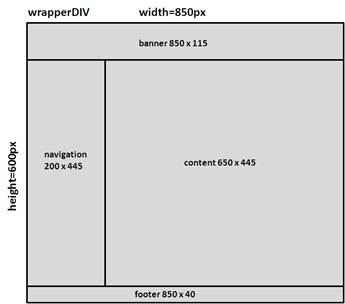
Below is the site map:

Below are the hexadecimals values for the DIV
tag layer colors:
1. Wrapper: #FFFF99
![]()
2. Banner Layer:
#FF9900
![]()
3. Navigation Layer: #3366CC
![]()
4. Content Layer: #FFFF99
![]()
5. Footer Layer: #FF9900
![]()
6. Body Tag: #FFFFCC
![]()
Prerequisites:
A. In Adobe Animate, create the Animate OAM package and JPG image
for the company logo.
1.
Launch Adobe Animate
2.
Open the companylogo.fla.
3.
Test the animation by pressing <Ctrl><Enter>.
4.
From the Main Menu, go to File and then select Publish
Settings.
5.
Select checkboxes- JavaScript/HTML, JPEG image and OAM Package
and click on the Publish button.

6.
In your images folder, verify that you have the companylogo.oam and JPG file – companylog.jpg
7.
Exit Adobe Flash
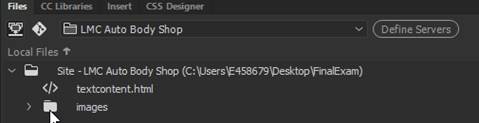
B. Setup the Manage Site in Dreamweaver
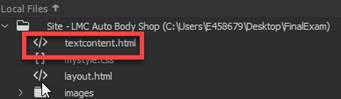
1. Download and extract the FinalExam.zip to your
desktop, Verify you have the FinalExam folder
2.
Verify in your site folder – FinalExam, you
have the following:
a. images folder
b. textcontent.html
4.
Setup the manage site
a. From the Main Menu, go File
and then select Site-> New Site
b. For the Site Name, enter
“LMC Auto Body Shop”.
b. For the Local Site Folder, select
the site folder – FinalExam that you downloaded to
your desktop.
5. Click on Save

6. Your File Panel should look like this
PART
1: Create the centered-two column
“layout” page.
A. Create an external CSS file.
1. Create
an external Cascading Style Sheet (CSS) file.
2. From the Main Menu, select File-> New
3. Select CSS and then click on Create

4. From the
Main Menu, select File-> Save As
5. Name the file as “mystyle.css”
and save the file in your site folder
6. Close
the mystyle.css.
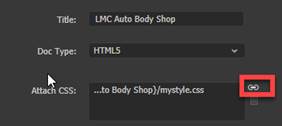
B. Create a new HTML document.
1.
Create a new HTML document.
2. Add the title “LMC Auto Body Shop” to the
html page.
3. Attach the external CSS file
4.. From
the Main Menu, select File-> Save As
5. From the Main Menu, select File-> Save As
6. Name and save the file as “layout.html” page in the site root
folder.
C.
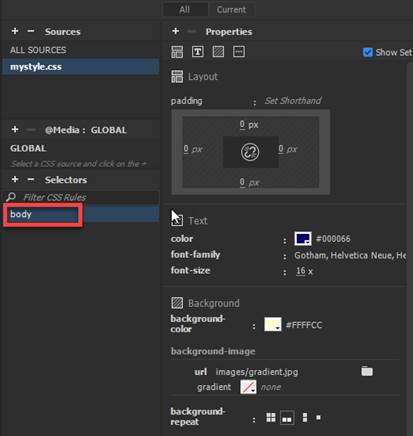
Create the body tag rule:
1.
Define the rule in the external CSS file- mystyle.css. Select
mystyle.css from the Sources.
2.
Click the + sign to add the Selector Name, enter body.
3.
Select and verify the following rules in the category:
font-family: Gotham, Helvetica
font-size:
16px
color:
#000066
background-color:
#FFFFCC
background-image: url(images/gradient.jpg)
background-repeat: repeat-x
padding:
0px (Note: Set the padding for all sides- top, right, bottom & left)
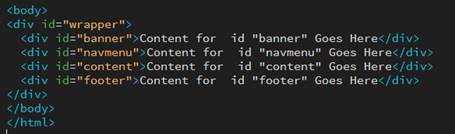
D. Create the wrapper DIV tag layer which will
be use to center the page.
1. Verify the cursor is blinking at the
top of the page
2. Insert a DIV tag at Insertion Point
3. Enter “wrapper” as the ID.
4. Click on New CSS rule.

5. Define the rule in your external CSS
file- mystyle.css

6.
Enter the following rules in the CSS Definition dialog box:
background-color: #FFCC33
width: 850px
height: auto
margin-right: auto
margin-left: auto
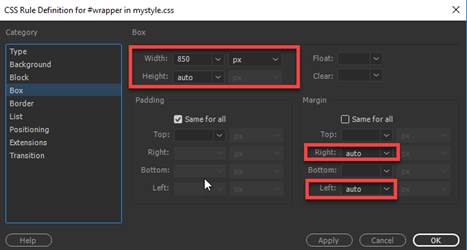
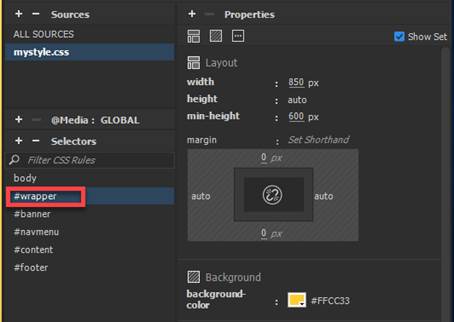
In the CSS
Styles panel, select #wrapper and click on the Add Property link to enter the minimum height value below:
Note:
Select the properties from the pulldown menu.
min-height: 600px

Note:
Below are the properties and values for #wrapperr
ID rule. Click on Show Set checkbox to
display the properties assigned to the ID rule
7. Delete the text placeholder in the DIV
container you created before proceeding.
![]()
NOTE: Before you proceed, you will need to delete
any text placeholder in the DIV layer.
E. Create the banner DIV tag layer.
1. Verify
there is no text in the #wrapper1 layer and the cursor
is blinking inside the container.
Note: In the Code window, the cursor
should be blinking in between the wrapper ID rule tag

2. Insert a
DIV tag at Insertion Point
3. Enter “banner” as the ID.
4. Click on
New CSS rule.

5. Define
the rule in your external CSS file-
mystyle.css
6. Enter
the following rules in the CSS Definition dialog box:
background-color: #FF9900
width: 850px
height:
115px

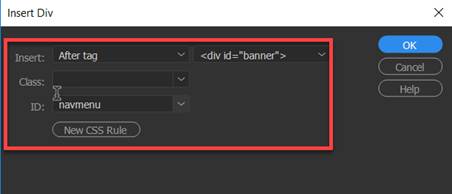
F. Create the navmenu
DIV tag layer.
1. Insert a
DIV tag.
2. For the
Insert, select “After tag” <div
id=”banner”>.
3. Enter “navmenu” as the
ID.
4. Click on
New CSS rule.
5. Define
the rule in your external CSS file-
mystyle.css.
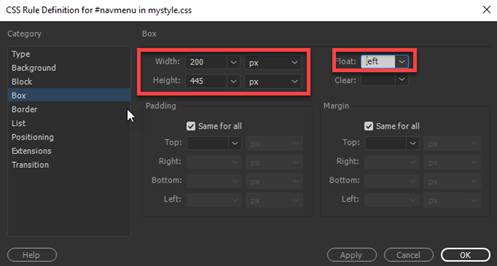
6. Enter
the following rules in the CSS Definition dialog box:
background-color:
#FFCC33
width:
200px
height:
445px
float: left
Note: Below are the properties and
values for #navmenu ID rule. Click on Show Set checkbox to display the
properties assigned to the ID rule

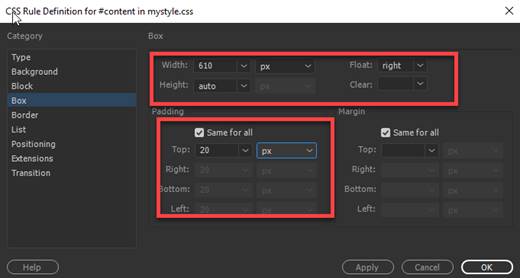
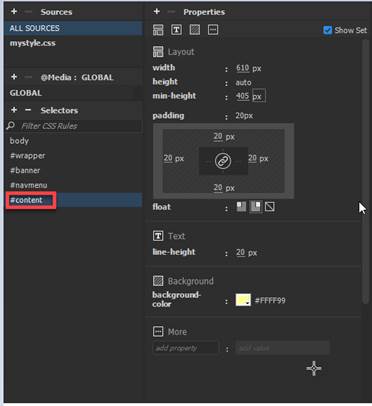
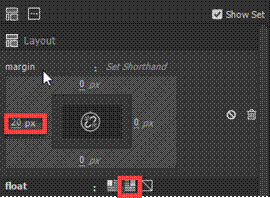
G. Create the content DIV tag layer.
1. Insert a
DIV tag.
2. For the
Insert, select “After tag” “<div
id=”navmenu”>.
3. Enter “content” as the ID.
4. Click on
New CSS rule.

5. Define
the rule in your external CSS file-
mystyle.css.
6. Enter
the following rules in the CSS Definition dialog box:
line-height: 20px (Note: This property is in
the Type category – See below)
background-color: #FFFF99
width: 610px
height: auto
float: right
padding:
20px (Note:
Set the padding for all sides- top, right, bottom & left)
In the CSS
Styles panel, click on the Add Property
link to enter the minimum height value below:
Note:
Select the properties from the pulldown menu.
min-height: 405px

Note:
Below are the properties and values for #content ID rule. Click on Show Set checkbox to display the
properties assigned to the ID rule
H. Create the footer DIV tag layer.
1. Insert a
DIV tag.
2. For the
Insert, select “After tag” “<div
id=”content”>
3. Enter “footer” as the ID.
4. Click on
New CSS rule.

5. Define
the rule in your external CSS file-
mystyle.css.
6. Enter
the following rules in the CSS Definition dialog box:
font-size:
13px;
background-color: #FF9900
text-align:
center;
width:
840px
height: 30px
clear:
both (Note:
This property is in the Box Category)
padding:
5px (Note: Set the padding for all sides- top, right, bottom & left)
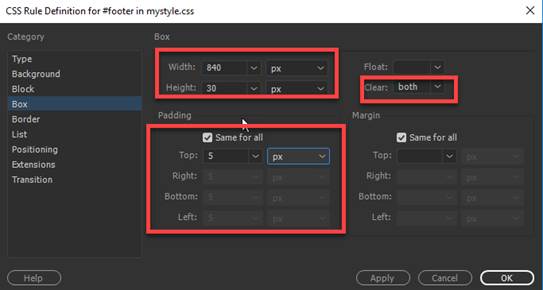
Note: Below are the properties and values for
#footer ID rule. Click on Show Set
checkbox to display the properties assigned to the ID rule

I. Save and Test:
1. Verify in your Source code, the following DIV layers are correctly
inserted
2. Select File and then Save
All.
3. Preview your web page by press F12.
5. Verify
your document is complete and that it closely matches the two-column
centered page layout below.
PART
2: Add the content in the “layout” page.
A. Setup the content in the banner layer.
1. Delete the text placeholder inside the banner
DIV tag layer.
Note: Verify that the cursor is blinking inside the banner DIV tag layer.
2. Insert the Animate file- companylogo.oam. in the banner layer.
From the Insert Panel, select
Animated Composition. Choose the complanylog.oam file
![]()
3. Select and highlight the
Animate and change the Width = 850 and
Height = 115 from the
Properties panel

B. Setup
the vertical navigation menu using an unordered list in the navmenu
DIV layer.
1. Create the compound style rule for the #navmenu ul
(unordered list tag) in the external style sheet.
Add the following rules:
font-size: 23px;
font-weight: bold;
margin: 0px (Note: Set for all padding
sides- top, right, bottom , left)
padding: 0px
(Note: Set for all margin sides- top, right, bottom ,
left)
list-style-type: none (Note: This property is in the Text Category)
2. Create the compound style rule for the #navmenu li (list
tag) in the external style sheet.
Add the following rule:
border-bottom-style:
solid (all
sides)
border-bottom-width:
1px (all sides)
border-bottom-color:
#FFFFFF (all
sides)

3. Create the compound style rule for the #navmenu a (anchor
tag) in the external style sheet.
Add the following rules:
color: #000066
text-decoration: none
display: block
padding:
10px (Note: Set for all sides- top, right,
bottom & left)
4. Create the compound style rule for the #navmenu a:hover (anchor:hover tag) in the external style
sheet.
Add the following rules:
color:
#FFFF99
background-color: #000066
5. Insert an unordered list
<ul> tag in the navmenu AP layer.
NOTE: Before proceeding, delete any text
placeholder inside the navmenu DIV tag layer.
Verify that the cursor is
blinking inside the navmenu DIV tag layer.
a. Click inside the navmenu
layer.
b. Verify the cursor is blinking inside
the navmenu layer.
c. In the Source code, verify the
cursor is blinking inside the navmenu DIV tag.

d. From the Insert panel, select the ul
- Unordered list to insert the <ul> tag inside the navmenu
layer.
![]()
6. Type the following text inside the navmenu
layer.
Highlight the text item and insert
the hyperlink by copying/ pasting into the Link field in the Properties
inspector.
Note:
Press <enter> after adding each item list.
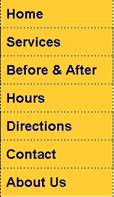
Home
index.html
Services services.html
Before & After beforeafter.html
Hours hours.html
Directions directions.html
Contact contact.html
About Us aboutus.html
Note: Open the Properties panel. From the Main Menu, select Window->
Properties.
7. Verify the links you have entered are
typed in correctly before proceeding.
NOTE:
Verify in your Source Code the ul and li tags are inserted correctly.

C. Setup the content in the footer layer
1. Copy and paste the footer text from the
textcontent.html page.
a. Delete the text
placeholder inside the footer DIV tag layer.
b. In the Source Code window,
verify the cursor is blinking inside the Footer DIV tag layer

c. In Dreamweaver, open the
textcontent.html page from the File Panel and copy/ paste the footer text
inside the content DIV layer.
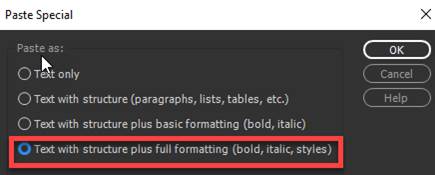
Note: To paste, use the Edit- Paste Special- Text
Only function.
d. Use the Line Break to separate the text
heading and paragraph (Shift Enter).
2.
Insert a placeholder hyperlink for the following:
Site Map sitemap.html
Privacy Policy policy.html
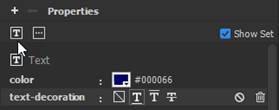
4. Create the compound style rule for the
#footer a (anchor tag).
Add the following rules:
text-decoration:
underline
color: #000066
5. Verify your footer content
display as shown below.
![]()
D. Save and
Test:
1. Select File and then Save All
Note:
This will save the “layout” HTML and style sheet documents.
2. Preview your web page by right click
on layout.html from the File Panel and selecting Open in Browser-> Google
Chrome

3. Verify your document is complete
and that it closely matches the two-column centered page layout below.
PART
3: Create all the pages for the site.
A. Create the index.html page.
1. Open
the layout.html page. Save a copy of the page as index.html.
2. Copy and paste the text content section
from the textcontent.html page.
a. Open the textcontent.html
page and copy/ paste the text inside the content DIV layer.
Note: To paste, use the Edit- Paste Special- Text
Only function.
b. Use the Line Break to separate the
text heading and paragraphs (Shift Enter).
Note:
Do not use the paragraph break hard return.
3.
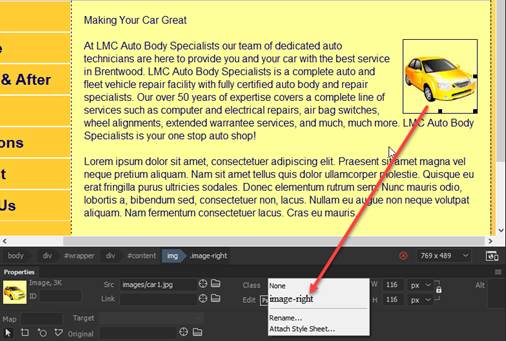
Insert the jpeg image file- car1.jpg.
a. Place the cursor before
the start of the first paragraph.
b. From the Files Menu, Go
to Insert and select Image.
c. Insert car1.jpg file into the page.
4. Create the style rule for the image file
and apply the rule.
a. Create a class style rule
called “.image-right” in your external stylesheet- mystyle.css.
Add the following rules.
float: right
margin-left: 20px
b. Select the image and
apply the class style image-right rule.
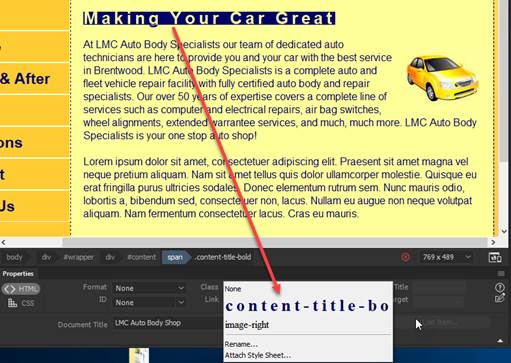
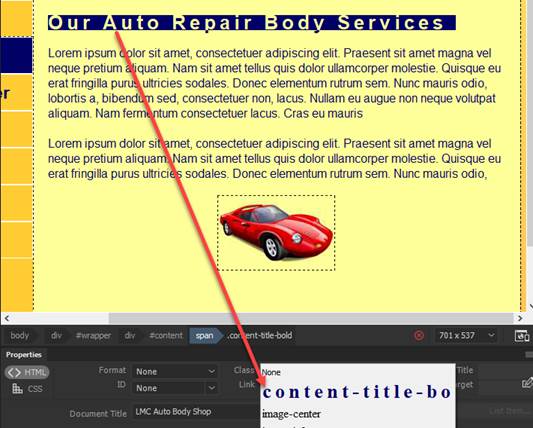
5. Create the style rule for the content title
heading and apply the rule.
a. Create a class style
rule called “.content-title-bold” in your external stylesheet- mystyle.css.
Add the following
rules:
font-size:
26px
font-weight: bold
color: #000066
letter-spacing: 5px (Note: This will be in Block Category)
margin-top: 0px
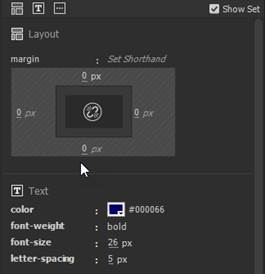
b. Select
the text heading “Making Your Car Great” and apply the class style rule.
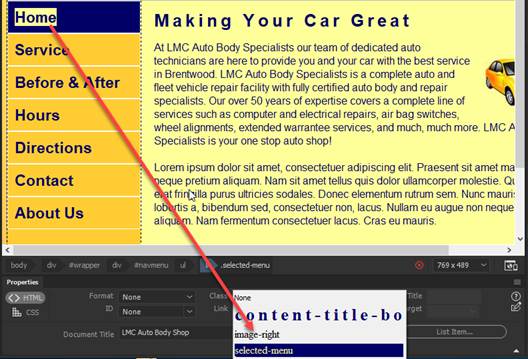
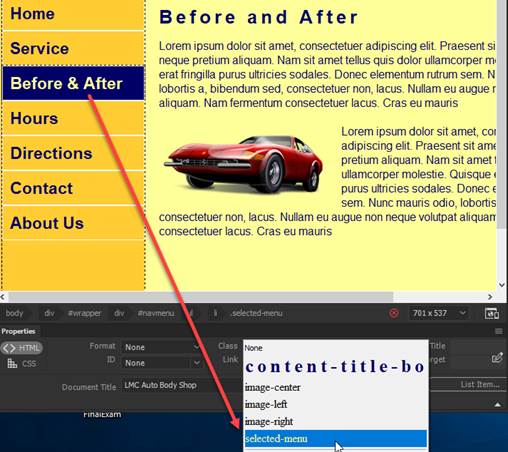
6. Create a new CSS rule for the
navigation menu for the active page.
a. Create a class style rule called “.selected-menu” in your external stylesheet-
mystyle.css.
b. Add the following rules:
color: #FFFF99
background-color:
#000066
display: block
padding: 10px (all sides)

e. In navmenu, highlight and select
the “Home” text.
f. Delete the index.html from the Link field in the Properties panel
 .
.
g. Apply the class rule selected-menu
to the “Home” text.
7. Save the page and style sheet. Go to the File Menu and select “Save All”.
8.
Test the page and verify if the content matches the page below.
9.
Close the index.html

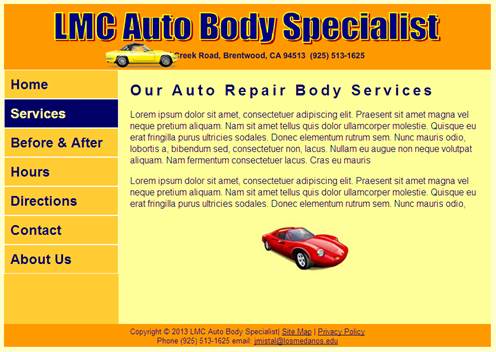
B. Create the services.html page.
1. Open
the layout.html page. Save a copy of the page as services.html.
2. Copy and paste the text content section
from the textcontent.html page.
a. Open the
textcontent.html page and copy/ paste the text inside the content DIV layer.
Note: To paste, use the Edit- Paste Special- Text
Only function.
b. Use the Line Break to separate
the text heading and paragraphs (Shift Enter).
Note: Do not use the paragraph break hard return.
3. Apply
the class style rule “.content-title-bold” to the heading text - “Our Auto Repair Body Services”.

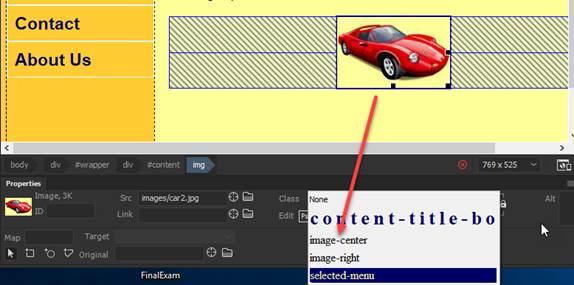
4.
Insert the jpeg image file- car2.jpg.
a. Create two line breaks
line by pressing <Shift><Enter> twice at the end of the text
content.
b. From the Files Menu, Go
to Insert and select Image.
c. Insert car2.jpg file into the page.
5. Create the style rule for the image file
and apply the rule.
a. Create a class style rule
called “.image-center” in your external stylesheet- mystyle.css.
Add the following rules:
display: block
margin-right: auto
margin-left: auto

b. Select the image and
apply the class style rule.
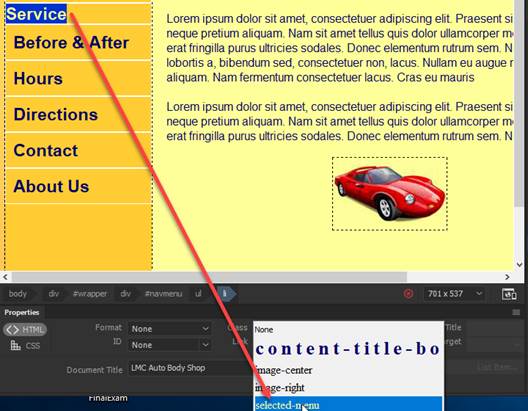
6. In navmenu,
apply the class rule .selected-menu for the “Services”
text.
a. Highlight
and select the “Services” text.
b. Delete the services.html from the Link field in the
Properties panel.

c. Apply the class rule .selected-menu
to the “Service” text.
7. Save the page and style sheet. Go to the File Menu and select “Save All”.
8.
Test the page and verify if the content matches the page below.
9.
Close the service.html page
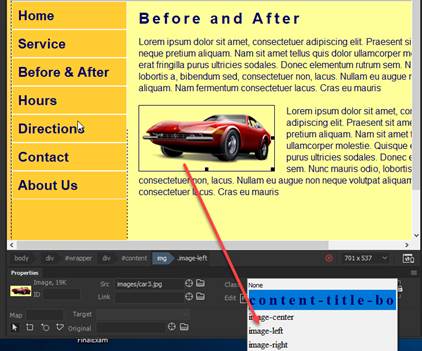
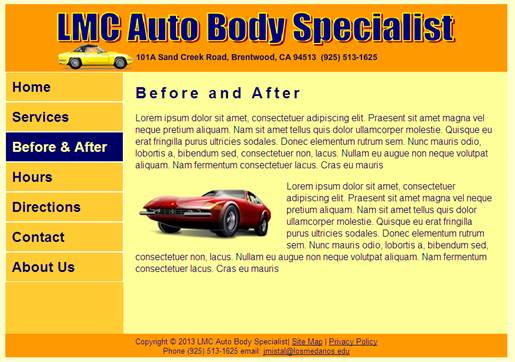
C. Create the beforeafter.html page.
1. Open
the layout.html page. Save a copy of the page as beforeafter.html
2. Copy and paste the text content section
from the textcontent.html page.
a. Open the
textcontent.html page and copy/ paste the text inside the content DIV layer.
Note:
To paste, use the Edit- Paste Special- Text Only function.
b. Use the Line Break to separate the
text heading and paragraphs (Shift Enter).
Note: Do not use the paragraph break hard return.
3. Apply
the class style rule “.content-title-bold” to the
heading text - “Before and After”.
4.
Insert the jpeg image file- car3.jpg.
a. Place the cursor before
the start of the second paragraph.
b. From the Files Menu, Go
to Insert and select Image.
c. Insert car3.jpg file into the page.
5. Create the style rule for the image file
and apply the rule.
a. Create a class style rule
called “.image-left” in your external stylesheet- mystyle.css.
Add the following rules:
float: left
margin-right: 20px
b. Select the image and
apply the class style rule.
6. In navmenu,
apply the class rule .selected-menu
for the “Before & After” text.
a
Highlight and select
the “Before & After” text.
b. Delete the beforeafter.html from the
Link field in the Properties panel.

c. Apply the class rule .selected-menu to the “Before &
After” text.
7. Save the page and style sheet. Go to the File Menu and select “Save All”.
8. Test
the page and verify if the content matches the page below.
9.
Close the beforeafter.html page
D. Create the hours.html page.
1. Open the layout.html page. Save a copy of the page as hour.html.
2. Copy and paste the text content section
from the textcontent.html page.
a. Open the
textcontent.html page and copy/ paste the text inside the content DIV layer.
Note: To paste, use the Edit- Paste
Special- Paste as: Text with structure plus full formatting.
b. Use the Line Break to separate
the text heading and paragraphs (Shift Enter).
Note: Do not use the paragraph break hard return.
3. Apply the class style rule “.content-title-bold” to the heading text - “Our Service Hours”.
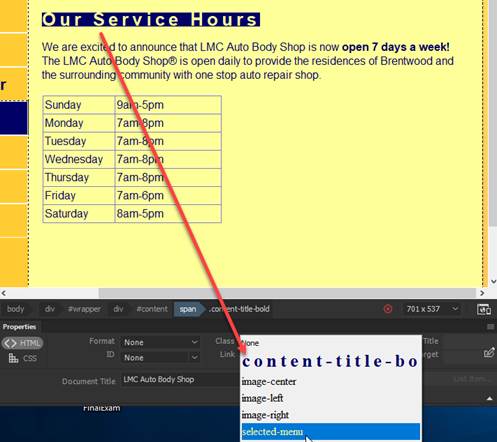
4. In the navmenu,
apply the class rule .selected-menu for the “Hours”
text.
a
Highlight and select
the “Hours” text.
b. Delete the hours.html from the Link
field in the Properties panel.

c. Apply the class rule .selected-menu to the “Hours” text.

5. Save the page and style sheet. Go to the File Menu and select “Save All”.
6.
Test the page and verify if the content matches the page below.
7.
Close the hours.html

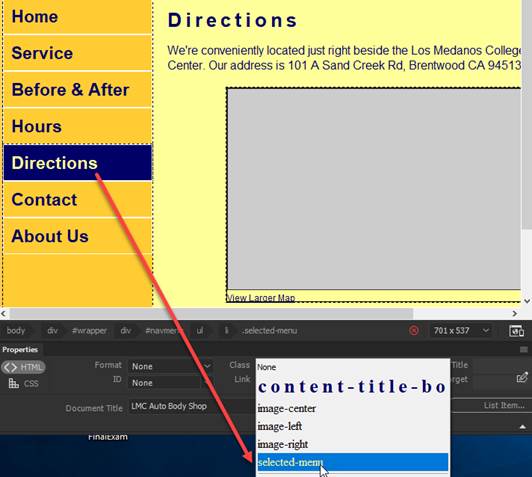
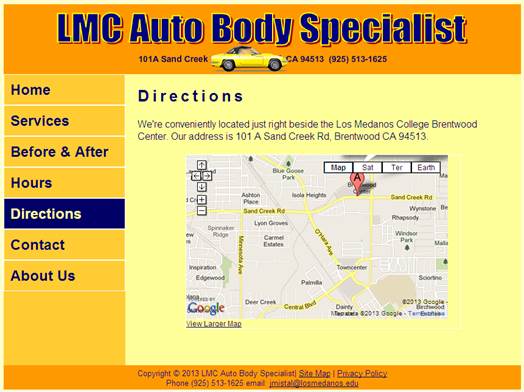
E. Create the directions.html page.
1. Open the layout.html page. Save a
copy of the page as directions.html.
2. Copy and paste the text content section
from the textcontent.html page.
a. Open the
textcontent.html page and copy/ paste the text inside the content DIV layer.
Note: To paste, use the Edit- Paste Special- Text
Only function.
b. Use the Line Break to separate the
text heading and paragraphs (Shift Enter).
Note: Do not use the paragraph break hard return.
3. Apply the class style rule “.content-title-bold” to the heading text - “Directions”.
4. Create two line breaks line by pressing <Shift><Enter>
twice at the end of the text content.
5.
Create the “googlemap” DIV tag layer and
insert the IFRAME.
a. Verify the cursor is blinking underneath
the paragraph.
b.
Insert a DIV tag.
c. For the Insert, select
“At insertion point”.
d. Select “googlemap” as the ID and then click OK button

Enter the following rules in the
CSS Definition dialog box:
width: 450px
height:
285px
margin-right: auto
margin-left: auto
border: solid 1px #FFFFFF (Note: Apply the border style, width and color to
all sides)

e. Click inside the “googlemap” DIV layer in Design View.
Remove the
text placeholder.
Note: Verify that the cursor pointer is inside the
DIV layer.

f. Go to the Code View. Verify that the cursor is
blinking in between the <div> tag below
![]()
g. Insert the following IFRAME code between the
opening and closing googlemap DIV tag.
Copy and paste the
iframe tag and attributes within the googlemap DIV
tag in the Code View
Note: To paste, use the Edit-
Paste Special- Text Only function.
|
<iframe width="450"
height="285" frameborder="0" scrolling="No" marginheight="0" marginwidth="0"
src="http://maps.google.com/maps?f=q&source=embed&hl=en&geocode=&q=101+A+Sand+Creek+Road,+Brentwood+CA+94513&aq=&sll=38.203655,-107.402344&sspn=48.794662,55.458984&ie=UTF8&hq=&hnear=101+Sand+Creek+Rd,+Brentwood,+California+94513&t=m&ll=37.942235,-121.703796&spn=0.01963,0.038624&z=14&iwloc=A&output=embed"></iframe>
<br />
<small><a
href="http://maps.google.com/maps?f=q&source=embed&hl=en&geocode=&q=101+A+Sand+Creek+Road,+Brentwood+CA+94513&aq=&sll=38.203655,-107.402344&sspn=48.794662,55.458984&ie=UTF8&hq=&hnear=101+Sand+Creek+Rd,+Brentwood,+California+94513&t=m&ll=37.942235,-121.703796&spn=0.01963,0.038624&z=14&iwloc=A"
target="_blank">View Larger Map</a></small> |
6. Create a compound style rule
for the hyperlink called “#googlemap a” in your
external stylesheet- mystyle.css.
Add the following rules.
font-size: 12px
color: #000066

7. In the navmenu,
apply the class rule .selected-menu for the
“Directions” text.
a
Highlight and select
the“Directions” text.
b. Delete the directions.html from the
Link field in the Properties panel.

c. Apply the class rule .selected-menu to the “Directions” text.
8. Save the page and style sheet. Go to the File Menu and select “Save All”.
9.
Test the page and verify if the content matches the page below.
F. Create the contact.html page.
1. Open the
layout.html page. Save a copy of the page as contact.html.
2. Copy and paste the text content section
from the textcontent.html page.
a. Open the
textcontent.html page and copy/ paste the text inside the content DIV layer.
Note: To paste, use the Edit- Paste Special- Text
Only function.
b. Use the Line Break to separate the
text heading and paragraphs (Shift Enter).
Note: Do not use the paragraph break hard return.
3. Apply
the class style rule “content-title-bold” to the
heading text - “Contact Us”.

4.
Insert the jpeg image file- car4.jpg.
a. Place the cursor before
the start of the text heading.
b. From the Files Menu, Go
to Insert and select Image.
c. Insert car4.jpg file into the page.
5. Apply
the class style rule “.image-right to the image that you inserted.

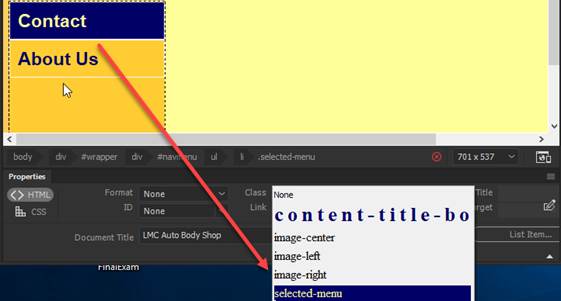
8. In the navmenu, apply the class rule .selected-menu
for the “Contact” text.
a
Highlight and select
the “Contact” text.
b. Delete the contact.html from the Link
field in the Properties panel.

c. Apply the class rule .selected-menu to the “Contact” text.
9. Save the page and style sheet. Go to the File Menu and select “Save All”.
10.
Test the page and verify if the content matches the page below.

G. Create the aboutus.html page.
1. Open
the layout.html page. Save a copy of the page as aboutus.html.
2. Copy and paste the content section text
from the textcontent.html page.
a. Open the
textcontent.html page and copy/ paste the text inside the content DIV layer.
Note: To paste, use the Edit- Paste Special- Text
Only function.
b. Use the Line Break to separate the
text heading and paragraphs (Shift Enter).
Note: Do not use the paragraph break hard return.
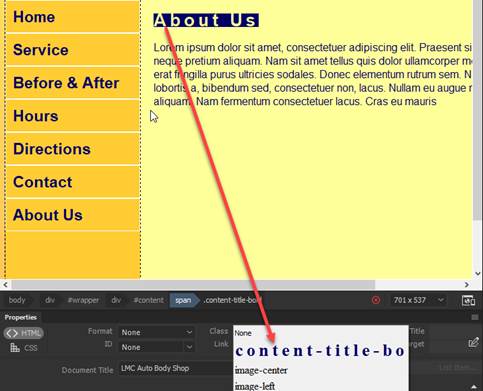
3. Apply
the class style rule “.content-title-bold” to the heading text - “About Us”.
4.
Insert the jpeg image file- car5.jpg.
a. Create two line breaks
line by pressing <Shift><Enter> twice at the end of the text
content.
b. From the Files Menu, Go to
Insert and select Image.
c. Insert car5.jpg file into the page.
5. Apply the class style rule “.image-center to the image that you inserted.

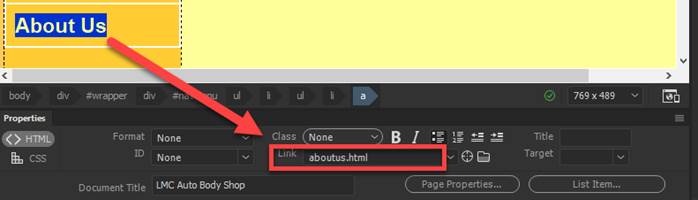
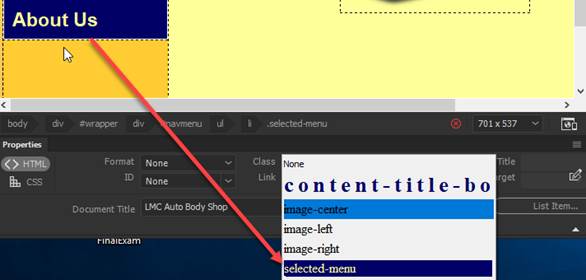
6. In the navmenu, apply the class rule .selected-menu
for the “About Us” text.
a
Highlight and select
the “About Us” text.
b.
Delete the aboutus.html from the Link field in the Properties panel.

c. Apply
the class rule .selected-menu to the
“About Us” text.
7. Save the page and style sheet. Go to the File Menu and select “Save All”.
8.
Test the page and verify if the content matches the page below.
9, Close the aboutus.html page.

PART 4: Test the web site.
A. Save all the HTML
documents and external style sheet.
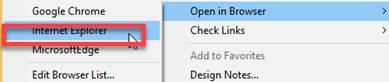
B. Preview your web page by right click
on layout.html from the File Panel and selecting Open in Browser-> Google
Chrome or Internet Explorer
C.
Test the web site by verifying if all the navigation menu links are all
working.
Submit:
1. Zip up
and compress your LMCAutoBody folder.
2. Before
submitting, verifying the zip folder is NOT
empty and contains all the files.
3. Upload the compressed folder into the Canvas- Final Exam drop box..
|
|
|
|
|
|
|
|
|
|
|
|
|
|
|
|
|
|