Animate Lab Exercise #8: Working with Symbols and Instances
Prerequisites:
1. Create
a folder on your desktop called Exercise 8.
2. Detach and unzip the chapter8 Flash file.
Place the Flash file inside your chapter8 folder.
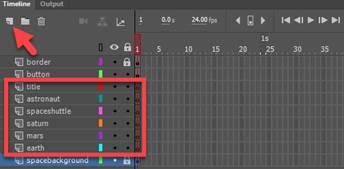
A. Add Layers (see Lab Exercise #6: Working with Layers):
1. Open the Animate file – chapter8_HTML5 Canvas.fla
2. Create 6 layers for the
other objects you will need in the timeline.
Name the layers as follows.
a. The 2nd layer will be the earth layer.
b. The 3rd layer will be the mars layer.
c. The 4th layer will be the saturn layer.
d. The 5th layer will be the spaceshuttle layer.
e. The 6th layer will be the astronaut layer.
f. The 7th layer will be the title layer.
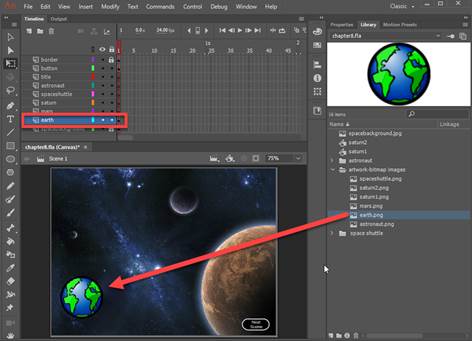
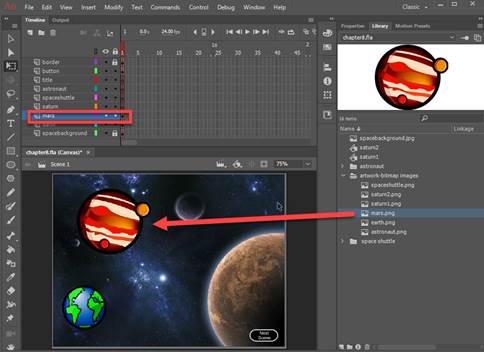
3. Select and drag from the Library panel, the bitmap object to
its appropriate layer on the Stage.
a. In frame 1 of the earth layer, copy and drag the earth.png from the Library
panel.
b. In frame 1 of the mars layer, copy and drag the mars.png from the Library
panel on the Stage.
B. Working with Symbols and Instances:
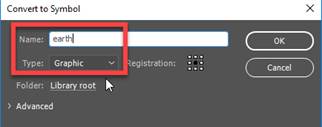
1. Create a graphic
symbol. Create a graphic symbol for the
earth and mars bitmap images
a.
Right click on the image and select Convert Symbol
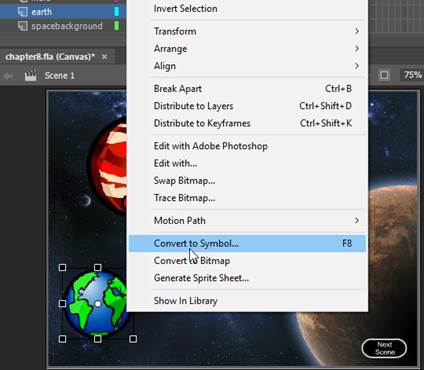
b. Enter the name the Symbol and select “Graphic”
for type. Click OK.
c
Repeat steps above to convert the Mars image to a graphic symbol
2. In the Saturn layer,
insert an instance of a graphic symbol to the stage.
a. In frame 1 of the Saturn layer,
copy and drag the saturn1 graphic symbol on to the Stage
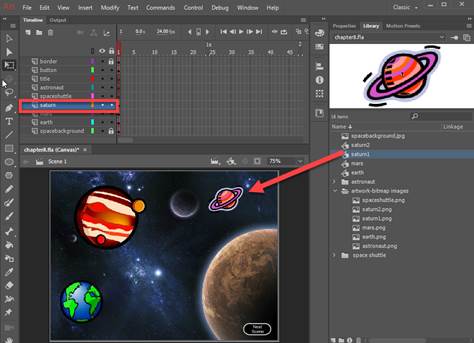
b. Increase the size of
the saturn1 graphic symbol using the Free Transform tool
![]()

3. Modify instances of the
graphic symbol. Add color effects to the
earth and saturn2 graphic symbols
a. Select the earth symbol on the Stage and in
the Properties tab, select Style = Alpha with 70% settings
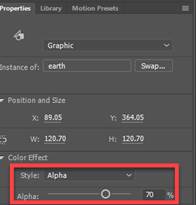
b. Repeat the steps above for the saturn2
graphic symbol on the Stage
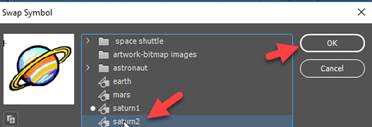
4 Swap symbols. Swap the saturn1 graphic symbol with that of
the saturn2 graphic symbol
a.
Select the Saturn1 graphic symbol on the stage and in the Properties
tab, click on the Swap button

b. Select saturn2 and then click OK. Position the symbol on the Stage using the
Selection tool.
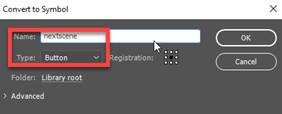
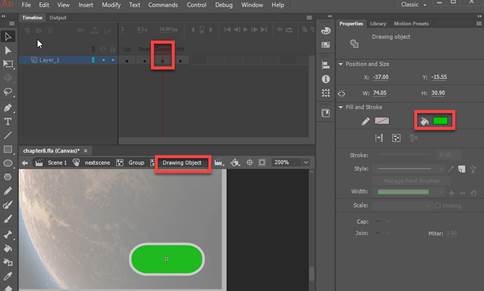
5. Create and edit a button
symbol
a. Right click on the button image
and select Convert to Symbol

b. Enter the name of the
symbol “nextscene” and select Button as the type.
c. Double click on the button symbol on the
Stage. In Over frame, right click and
select Insert Keyframe
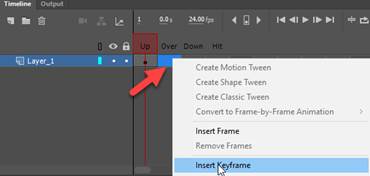
d. Repeat step c to create
a Keyframe for the Down and Hit frames
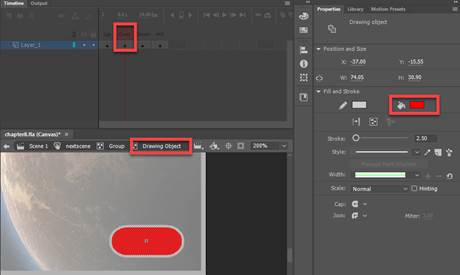
e. Select the Over frame. Double click couple times on the button
symbol until you get to Drawing object
Change the fill to ‘red. Once done, click on the Scene1 tab
f. Select the Down frame. Double click couple times on the button
symbol until you get to Drawing object
Change the fill to ‘green”. Once done, click on the Scene1 tab
7. Add a dynamic text for
the title
a.
In the title layer, click on the Text toolbar. Select Dynamic Text.
Change the font style as
follows:
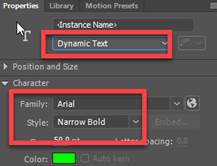
b. Add the text below in the textbox. Use the selection tool to increase the size
of the text box.

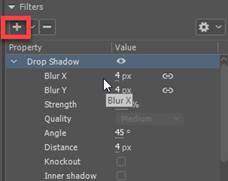
c. For the text box, add a Drop Shadow filter
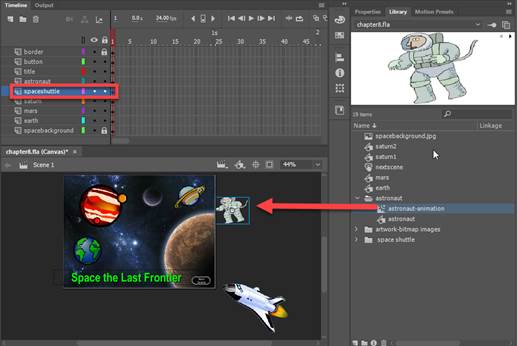
8. Add an instance of movie
clip symbol to the stage.
a. In frame 1 of the spaceshuttle
layer, from the library panel, copy and drag the spaceshuttle-animation
movie symbol at the outside right corner of the Stage.
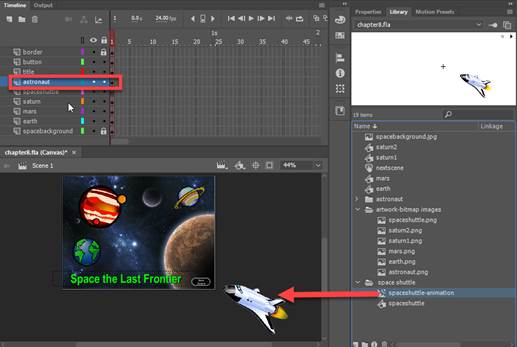
b. In frame 1 of the astronaut layer, from
the library panel, copy and drag the astronaut-animation movie symbol at
the outside right hand side of the Stage
 .
.
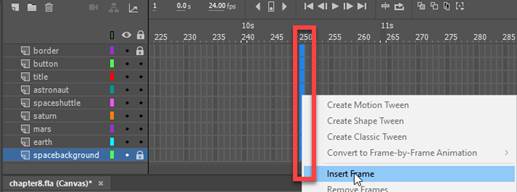
C. Add Frames in the Timeline
1. Add regular frames to all layers. In frame 250 on the timeline, right click
and Insert Fame.
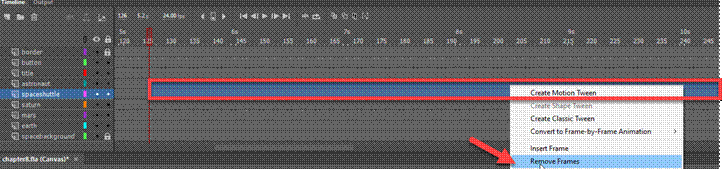
2. For the spaceshuttle and
astronaut layers, remove frames from frame 126 to 250. Select and highlight the frames, right
click and choose Remove Frames
3. In the astronaut layer,
move the frames to start at frame 126 by clicking, holding the mouse key and
dragging the entire frames to it new frame location.
Note: The keyframe should start on frame 126
in the astronaut layer of the timeline.

D. Save, Publish and Test Movie
1. Verify
your document has the required symbols on the timeline and stage. See attached sample of the Flash output
file- Chapter8_output.html.
2.
Save your Animate Chapter8.fla file in your chapter8 folder.
3. Publish your file in JavaScript/HTML format.
From the Main
Menu, select Publish Settings.
Select “Center Stage = Both” only
Click on the Publish button
4. Test Movie.
Press <Ctrl><Enter> or from the Main Menu, select, Control
-> Test
Submit:
1. Submit the screenshot of
the output result when you test the Movie in step # D4
On your keyboard, press <Print
Screen> and then paste into a Paint document. Save the file as a JPG
2. Zip up your Exercise-8 folder containing the
Animate Files
NOTE: Right click on the folder and select Send to
“Compress Folder”. The file will have a
file extension of .zip.
3. Submit and upload the
screenshots and zipped up compress Exercise-8 folder to the Canvas Animate Exercise 8 drop box