Animate Project Part 1 (30
points)
Prerequisites:
1. Create
a folder on your desktop called Project1.
2. Detach and unzip the FlashProject.zip.
Place the Flash file inside your Project1 folder.
3. See attached sample of the Flash output file- FlashProject1.html.
Requirements:
1. Open the Flash file- FlashProject1.fla
Enlarge the stage by increasing the
Zoom-In to 200%.
![]()
2. Scene 1 Folder:
a. In the background layer, copy and drag the picture1.jpg
under the original bitmap images folder to frame 1
b.
In the Properties panel, ensure the X and Y coordinates are “0” to
ensure the image is on top of stage.
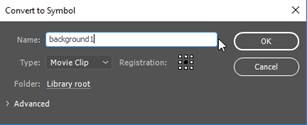
c. Right click on the picture1.jpg and select
“Convert to Symbol”. Name the symbol as background1
and select the type as “Movie Clip”

d. Naming the instances of the movie clip:


3. Scene 2 Folder
a. In
the background layer, copy and drag the picture2.jpg under the original
bitmap images folder to frame 76
b. In
the Properties panel, ensure the X and Y coordinates are “0” to ensure the
image is on top of stage.
c.
Right click on the picture1.jpg and select “Convert to Symbol”. Name the symbol as background2 and
select the type as “Movie Clip”
d. Naming the instances of the movie clip:

4. Scene 3 Folder:
a. In the background layer, copy and drag the picture3.jpg
under the original bitmap images folder to frame 151
b.
In the Properties panel, ensure the X and Y coordinates are “0” to
ensure the image is on top of stage.
c.
Right click on the picture1.jpg and select “Convert to Symbol”. Name the symbol as background3 and
select the type as “Movie Clip”

d. Naming the instances of the movie clip:

5. Scene 4 Folder
a. In the background layer, copy and drag the picture4.jpg
under the original bitmap images folder to frame 225
b.
In the Properties panel, ensure the X and Y coordinates are “0” to
ensure the image is on top of stage.
c. Right click on the picture1.jpg and select
“Convert to Symbol”. Name the symbol as background4 and select the type as “Movie
Clip”
d. Naming the instances of the movie clip:

6. Title Layer- Add the GGTitle
graphic symbol to frame 1.
7. Test the Flash movie by pressing <Ctrl><Enter>.
8. Go to File and select Publish
Settings.
Click on OAM package checkbox to insert Animation component into the web page.
Click on the Publish button

Publish
an Animate document as a JPEG Image
1. Open the companylogo.fla.
2. Publish the file to a JPEG image.
3. Save with an output name
companylogo.jpg.
NOTE: See attached sample of the JPEG image file- companylogo.jpg
Submit:
1. Save your Animate
Flash file in your Project1 folder.
2.
Zip up the folder containing the files below and upload to the
Animate Flash Project Part 1