Dreamweaver
Lab Lesson 7
In
this lesson, you will be creating all the pages for the LMC Brentwood Café site
using the centered- two column page layout you created in Lesson 6.
You
will also be creating a vertical navigation menu using the unordered list.
1.
Create the vertical navigation menu using the unordered list tag.
2. Use the CSS Box Model technique in adding margins and padding to the DIV tag
layers and content elements.
3.
Insert the SWF, image and text elements into the DIV layers.
4.
Add and apply the layout and format style rules for the DIV tags and content
elements.
5.
Test the web site by verifying the links are working in the navigation menu.
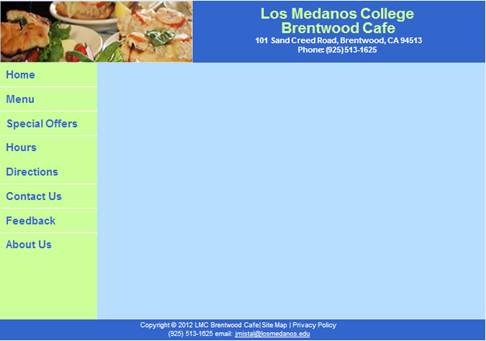
Desired Output:
Attached is the desired output for Lesson7
sample pages.
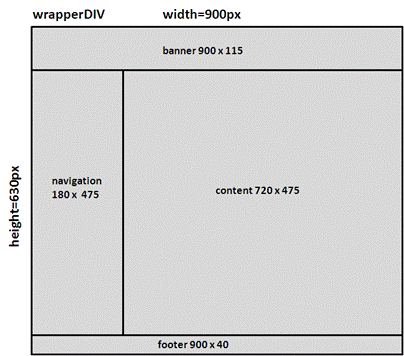
Below is the wireframe:
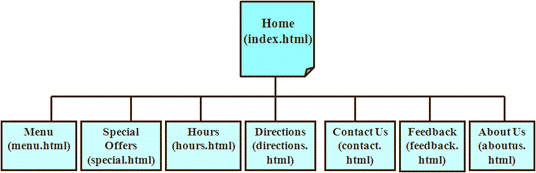
Below is the site map:
Prerequisites:
1. Create a
site folder on your desktop called Lesson7.
2. Download AssignmentLesson7.zip on your
desktop.
NOTE: In your Lesson 7 site folder, you
have the following files:
a.
layout2.html
b.
mystyle2.css
c.
textcontent.html
d.
images folder
A. Setup the Manage Site.
1. Open the Manage Site
dialog box.
2. Select the LMC Brentwood
Café site and click on Edit.
3. Re-point the LMC
Brentwood Café site folder to the Lesson7 folder on your desktop.
4. From the File Panel,
open the layout2.html.

5. Ensure the Properties
panel is open. Go to Windows-> Properties
or press <Ctrl><F3>. You can dock the panel at the bottom of the
screen.

B. Insert the banner image
in the banner DIV layer.
1. Delete the text placeholder in
the banner DIV layer.
2. Insert the banner.jpg in the
banner DIV layer.
3. Add an alternative text for
the inserted image.

C. Setup the vertical navigation menu using an unordered list tag
in the navmenu DIV layer.

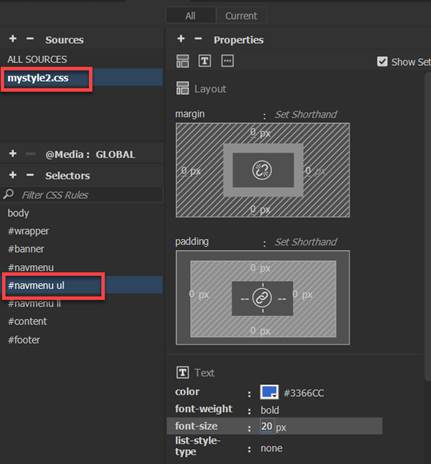
1. Create the compound style rule
for the #navmenu ul (unordered
list tag) in the external style sheet.
a. Create a new Compound CSS rule. Select mystylestyle.css and then click on the
+ for Selectors
b. Enter the selector name, enter #navmenu ul (Note: You can also copy/ paste the name)
c. For the rule definition, select your external style sheet- mystyle2.css
d. Add the following rules:
font-size: 20px
font-weight: bold
color: #3366CC
padding: 0px (all sides)
margin: 0px ((all sides)
list-style-type: none
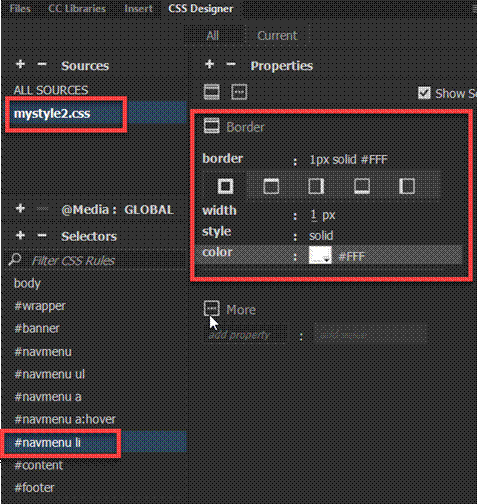
2. Create the compound style rule
for the #navmenu li (list tag) in
the external style sheet.
a. Create a new Compound CSS rule. Select mystylestyle.css and then click on the
+ for Selectors
b. For
the selector name, enter #navmenu li (Note: You can also copy/ paste the name)
c. For the rule definition, select your external style sheet- mystyle2.css
d. Add the following rules:
border: 1px solid #FFF (all sides)
3. Create the compound style rule
for the #navmenu a (anchor tag) in
the external style sheet.
a. Create a new Compound CSS rule. Select mystylestyle.css and then click on the
+ for Selectors
b. For the selector name, enter #navmenu a (Note: You
can also copy/ paste the name)
c. For the rule definition, select your external style sheet- mystyle2.css
d.
Add the following rules:
color: #3366CC
text-decoration: none
display: block (Note: You will need to enter this selector
and value)
padding: 10px (all sides)

4. Create the compound style rule
for the #navmenu a:hover (anchor:hover tag) in the external style sheet.
a. Create a new Compound CSS rule. Select mystylestyle.css and then click on the
+ for Selectors
b. For
the selector name, enter #navmenu a:hover
c. For the rule definition, select your external style sheet- mystyle2.css
d. Add the following rules:
color: #FFF
background-color: #3366CC

5. Insert an unordered list <ul> tag in the navmenu
AP layer.
NOTE:
Before proceeding, delete the text placeholder inside the navmenu DIV tag layer.
Verify that the cursor is blinking inside the
navmenu DIV tag layer.
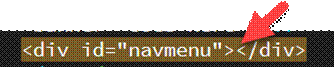
a. Click inside the
navmenu layer.
b. Verify the cursor is blinking
inside the navmenu layer.
d. From the Insert Panel, select and click the ul - Unordered list to insert the <ul> tag inside the navmenu DIV layer.
![]()
6. Type the following text inside
the navmenu layer and insert the hyperlinks from the Insert Panel
You can use the Properties inspector. Go
to Windows->Properties or Ctrl + F3
Note:
Press <enter> to add each item list.
Home index.html
Menu menu.html
Specials specials.html
Hours hours.html
Directions directions.html
Contact contact.html
Feedback feedback.html
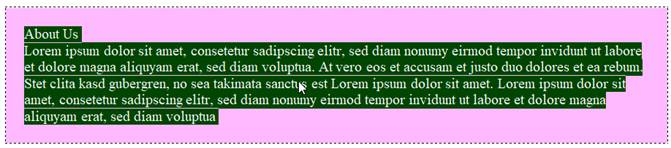
About Us aboutus.html
7. Verify the links you
have entered are typed in correctly before proceeding.
Note:
Links in your navmenu will not work if the file
name is entered correctly.

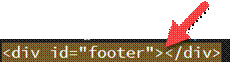
D. Insert the text content in the
footer DIV layer.
NOTE:
Before proceeding, delete any text placeholder inside the footer DIV tag
layer.
![]()
Verify that the cursor is blinking inside the footer DIV tag layer.
1. Copy and paste the following text in the footer
layer.
Note: Use Paste Special- Text Only.
Use a line break to have the phone and email address to display on
separate line (Shift Enter)
Copyright © 2012 LMC Brentwood Cafe| Site Map |
Privacy Policy
(925) 513-1625 email: enter your email address
2.
Add the text hyperlink for the following links:
a. Site Map:
sitemap.html
b. Privacy Policy: policy.html
3.
Add the email hyperlink for the email address:
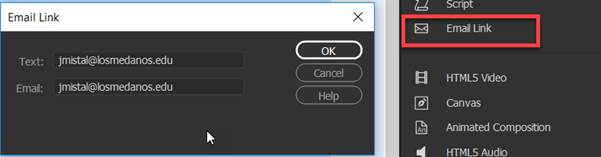
4. Create a new CSS rule for the anchor <a> link tag for the
footer ID.
a. For the selector type, select Compound
b. For the selector name, enter #footer a
c. For the rule definition, select
your external style sheet- mystyle2.css
d. Add
the following rules:
color: #FFF

![]()
E. Save the layout2.html
and external style sheet.
1. Go to the File Menu and select “Save All”.
2. Close the layout2.html page.
Note:
You will be using this layout page to create all the pages for the LMC
Brentwood Café site.
F. Create the index.html page.
1. Open
the layout2.html page from the File Panel.
2. Save a copy of the page as index.html.
3. Delete any text placeholder in the content
DIV layer.
4. Place the cursor inside the DIV layer.
Note:
In the Code window, the cursor should be blinking in between the content
dive tab
![]()
5. Copy and paste the text content section from the textcontent.html
page.
a. Open the textcontent.html
page and copy/ paste the text inside the content DIV layer.
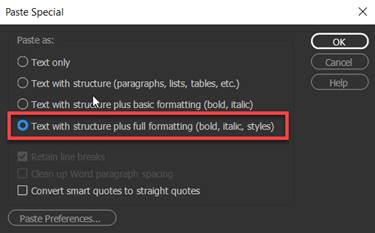
Note: To paste, use the Edit- Paste Special- Text
Only function.

b. Use the Line
Break to separate the text heading and paragraphs (Shift Enter).
Note: Do
not use the paragraph break hard return.
6. Insert the SWF (Animate Canvas
File)- sandwichphoto.oam.
a. Place the cursor before the start of the text heading.
b. Insert the sandwichphoto.oam. Go to Insert panel and Animated Composition
![]()
7. Create the style rule for the SWF file and apply the rule.
a. Create a class style rule called .imageAnimate in your external stylesheet- mystyle2.css.
Add the following rules:
float: right
margin-left: 20px
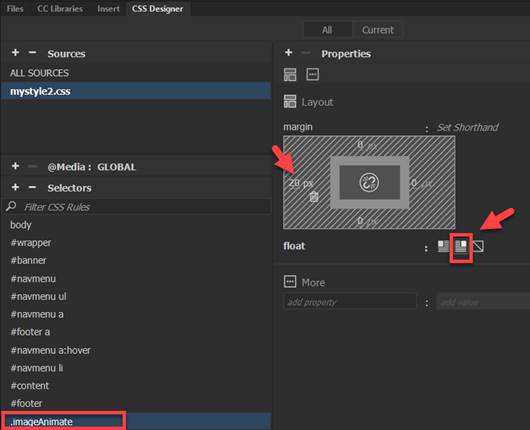
b. Apply the .imageAnimate
class style rule to Animate Composition file.
Click on the animation file and select the Class rule.

9. Create the style rule for the content heading and apply the rule.
a. Create a class style rule called “.textheader” in your external stylesheet- mystyle2.css
Add the following rules:
font-size:
22px
font-weight:
bold
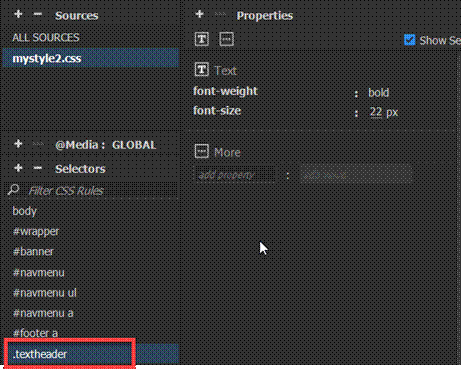
b. Apply the class style rule to text heading- Welcome to LMC Brentwood
Café.
Highlight the text and select
the textheader class rule from the Properties panel

10. Save the page and style
sheet. Go to the File Menu and select “Save
All”.
11. Close the page after verifying the
index.html page matches the ouput below.

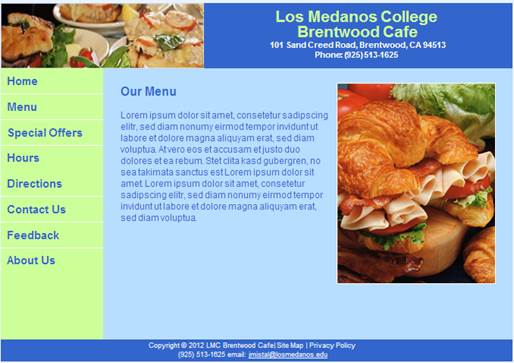
G. Create the menu.html page.
1. Open
the layout2.html page.
2. Save a copy of the page as menu.html.
3. Delete any text placeholder in the content
DIV layer.
4. Place the cursor inside the DIV layer.
Note:
In the Code window, the cursor should be blinking in between the content
dive tab
![]()
5. Copy and paste the text content section from the textcontent.html
page.
a. Open the textcontent.html page and
copy/ paste the text inside the content DIV layer.
Note: To paste, use the Edit- Paste Special- Text
Only function.

b. Use the Line
Break to separate the text heading and paragraphs (Shift Enter).
Note: Do not use the paragraph break hard return.
6. Apply the class style rule .textheader to
the heading text - “Our Menu”.
Highlight the text and select the
textheader class rule from the Properties panel

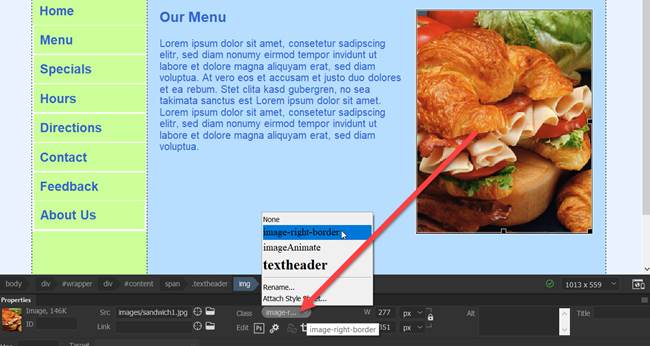
7. Insert the jpeg image file- sandwich1.jpg.
a. Place the cursor before the start of the text heading.
b. From the Files Menu, Go to Insert and select Image.
c. Insert sandwich1.jpg file into
the page.
8. Create the style rule for the image file and apply the rule.
a. Create a class style rule called .image-right-border in your external stylesheet-
mystyle2.css.
Add the following rules:
float:
right
margin-left:
20px
border:
solid 1px #FFF (all sides)
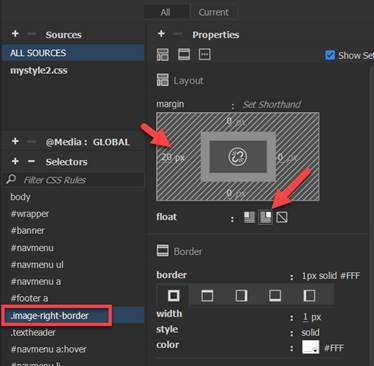
b. Apply the class style rule to
the image file. Select the image and
then select the .image-right-border from the
Properties panel
Highlight the text and select
the textheader class rule from the Properties panel
9. Save the page and style sheet. Go to the File Menu and select “Save All”.
10.
Close the page after verifying the menu.html page matches the ouput below. .
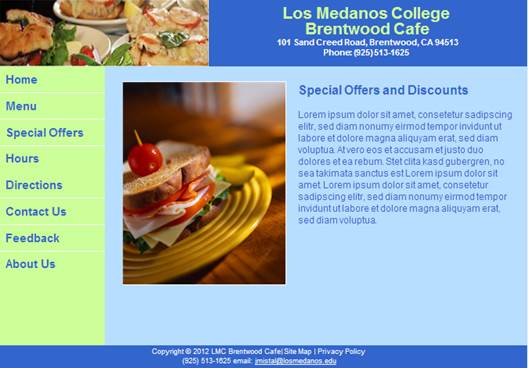
H. Create the specials.html page.
1. Open
the layout2.html page.
2. Save a copy of the page as specials.html
3. Delete any text placeholder in the content
DIV layer.
4. Place the cursor inside the DIV layer
Note: In the Code window, the cursor should be
blinking in between the content dive tab
![]()
5. Copy and paste the text content section from the textcontent.html
page.
a. Open the textcontent.html page and
copy/ paste the text inside the content DIV layer.
Note: To paste, use the Edit- Paste Special- Text
Only function.
b. Use the Line Break to separate the text
heading and paragraphs (Shift Enter).
Note: Do not use the paragraph break hard return.
6. Apply the class style rule .textheader
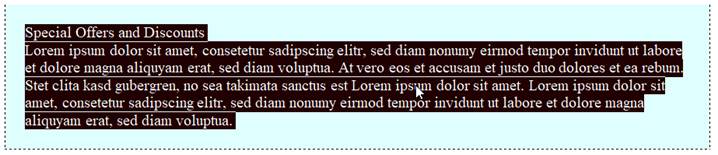
to the heading text - “Special Offers and Discount”.
Highlight the text and select the
textheader class rule from the Properties panel
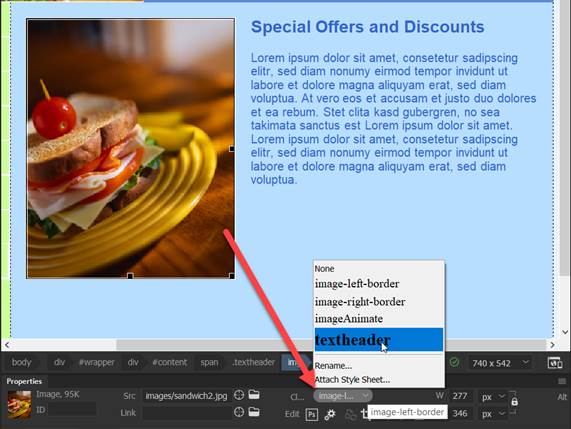
7. Insert the jpeg image file- sandwich2.jpg.
a. Place the cursor before the start of the text heading.
b. From the Files Menu, Go to Insert and select Image
c. Insert sandwich2.jpg file into the page.
8. Create the style rule for the image file and apply the rule.
a. Create a class style rule called .image-left-border in your external stylesheet- mystyle2.css.
Add the following rules:
float:
left
margin-right:
20px
border:
solid 1px #FFF
(all sides)

b. Apply the class style rule to image file.
9. Save the page and style sheet. Go to the File Menu and select “Save All”.
10.
Close the page after verifying the specials.html page matches the ouput below.
I. Create the hours.html page.
1. Open the layou2.html page.
2. Save a copy of the page as hours.html
3. Delete any text placeholder in the
content DIV layer.
4. Place the cursor inside the DIV layer
Note: In the Code window, the cursor should be
blinking in between the content dive tab
![]()
5. Copy and paste the text content section from the textcontent.html
page.
a. Open the textcontent.html page and
copy/ paste the text inside the content DIV layer.
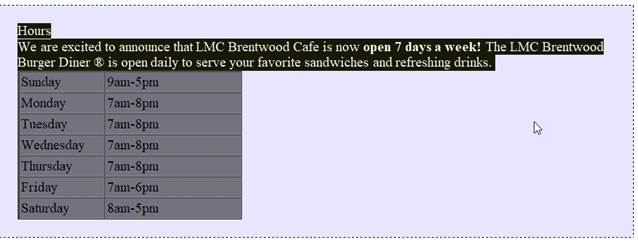
Note: To paste, use the Edit- Paste Special- Paste as: Text with structure plus
full formatting.
b. Use the Line Break to separate
the text heading and paragraphs (Shift Enter).
Note: Do not use the paragraph break hard return.
6. Apply the class style rule to .textheader you
created in to the heading text - “Hours”.
Highlight the text and select the
textheader class rule from the Properties panel
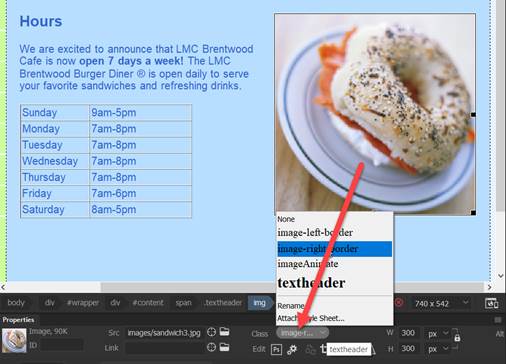
7. Insert the jpeg image file- sandwich3.jpg.
a. Place the cursor before the start of the text heading.
b. From the Files Menu, go to Insert and select Image
c. Insert sandwich3.jpg file into the page.
8. Apply the class style rule .image-right-border to the image that you inserted.
9. Save
the page and style sheet. Go to the
File Menu and select “Save All”.
10.
Close the page after verifying the hours.html page matches the ouput below..

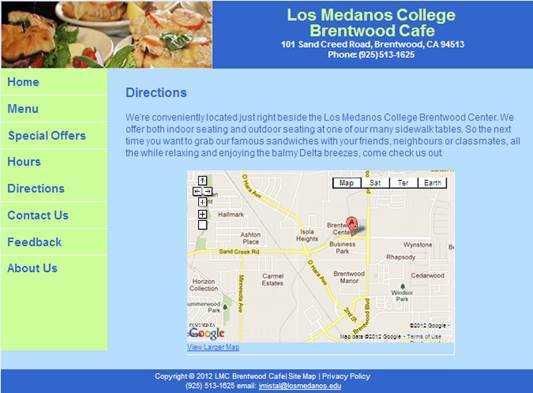
J. Create the directions.html page.
1. Open the layou2.html
page.
2. Save a copy of the page as directions.html
3. Delete any text placeholder in the
content DIV layer.
4. Place the cursor inside the DIV layer
Note:
In the Code window, the cursor should be blinking in between the content
dive tab
![]()
5. Copy and paste the text content section from the textcontent.html
page.
a. Open the textcontent.html page and
copy/ paste the text inside the content DIV layer.
Note: To paste, use the Edit- Paste Special-
Text Only function.

b. Use the Line Break
to separate the text heading and paragraphs (Shift Enter).
Note: Do not use the paragraph break hard return.
6. Apply the class style rule .textheader
to the heading text - “Directions”.
Highlight the text and select
the textheader class rule from the Properties panel
7. Create two Line
Break by pressing <Shift><Enter>
at the end of the text paragraph.
Prior to proceeding,
verify the cursor is in the content DIV layer underneath the text content.
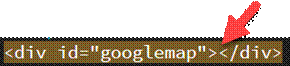
8. Create the “googlemap” DIV tag
layer and insert the IFRAME.
a. Insert a DIV tag.
b. For the Insert, select “At
insertion point”.
c. Enter “googlemap” as the ID.
d. Click on the New CSS Rule button.
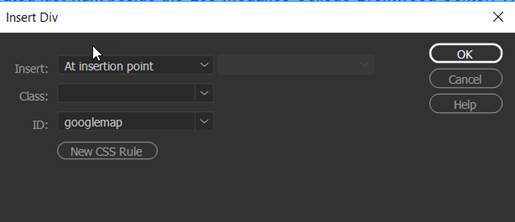
Define the rule in this Document Only

e. Enter the following rules in the CSS Definition dialog box:
width:
450px
height: 310px
margin-right:
auto
margin-left:
auto
border:
solid 1px #FFF (all sides)

f. Click inside the “googlemap” DIV layer in Design View.
Remove the text placeholder.
Note: Verify that the cursor pointer is inside the
DIV layer.
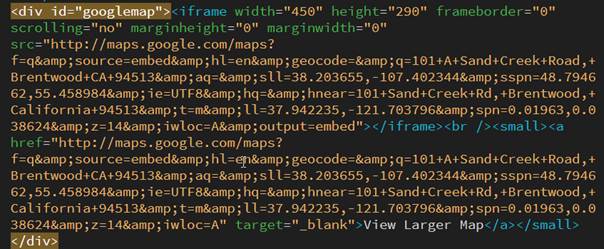
g. Go to the Code View.
Insert the following IFRAME code between the opening and closing
googlemap DIV tag.
Copy and paste the iframe tag and
attributes within the googlemap DIV tag in the Code View.
Note: To paste, use the Edit-
Paste Special- Text Only function.
|
<iframe width="450"
height="290" frameborder="0" scrolling="no"
marginheight="0" marginwidth="0"
src="http://maps.google.com/maps?f=q&source=embed&hl=en&geocode=&q=101+A+Sand+Creek+Road,+Brentwood+CA+94513&aq=&sll=38.203655,-107.402344&sspn=48.794662,55.458984&ie=UTF8&hq=&hnear=101+Sand+Creek+Rd,+Brentwood,+California+94513&t=m&ll=37.942235,-121.703796&spn=0.01963,0.038624&z=14&iwloc=A&output=embed"></iframe><br
/><small><a
href="http://maps.google.com/maps?f=q&source=embed&hl=en&geocode=&q=101+A+Sand+Creek+Road,+Brentwood+CA+94513&aq=&sll=38.203655,-107.402344&sspn=48.794662,55.458984&ie=UTF8&hq=&hnear=101+Sand+Creek+Rd,+Brentwood,+California+94513&t=m&ll=37.942235,-121.703796&spn=0.01963,0.038624&z=14&iwloc=A"
target="_blank">View Larger Map</a></small> |
Below is the iframe code that gets
inserted in the DIV tag layer - googlemap
9. Save
the page and style sheet. Go to the
File Menu and select “Save All”.
10. Close the page after verifying the
directions.html page matches the ouput below
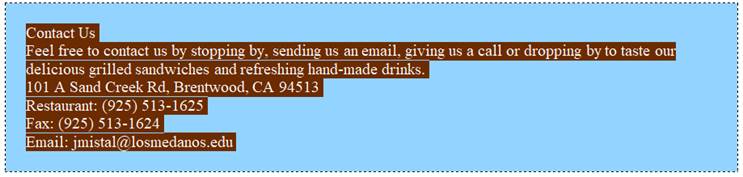
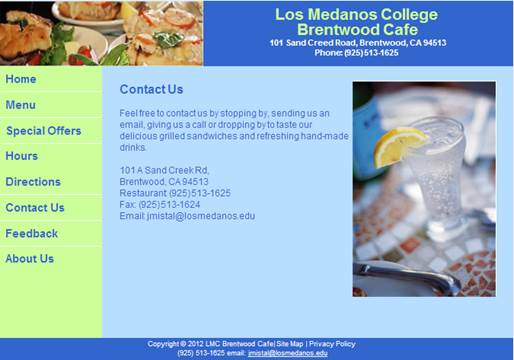
K Create the contact.html page.
1. Open
the layout2.html page.
2. Save a copy of the page as contact.html
3. Delete any text placeholder in the
content DIV layer.
4. Place the cursor inside the DIV layer
Note:
In the Code window, the cursor should be blinking in between the content
dive tab
![]()
5. Copy and paste the text content section from the textcontent.html
page.
a. Open the
textcontent.html page and copy/ paste the text inside the content DIV layer.
Note: To paste, use the Edit- Paste Special- Text
Only function.
b. Use the Line
Break to separate the text heading and paragraphs (Shift Enter).
Note: Do not use the paragraph break hard return.
6. Apply the class style rule .textheader to the
heading text - “Contact Us”.
Highlight the text and select the
textheader class rule from the Properties panel
7. Insert the jpeg image file- drink1.jpg.
a. Place the cursor before the start of the text heading.
b. From the Files Menu, Go to Insert and select Image
c. Insert drink1.jpg file into the page.
8. Apply the class style rule .image-right-border to the image that you inserted.

9. Save the page and style sheet. Go to the File Menu and select “Save All”.
10.
Close the page after verifying the contact.html page matches the output
below.
L. Create the feedback.html page.
1. Open the layou2.html page.
2.
Save a copy of the page as feedback.html.
3. Delete any text placeholder in the
content DIV layer.
4. Place the cursor inside the DIV layer
Note:
In the Code window, the cursor should be blinking in between the content
dive tab
![]()
5. Copy and paste the text content section from the textcontent.html
page.
a. Open the textcontent.html page and
copy/ paste the text inside the content DIV layer.
Note: To paste, use the Edit- Paste Special-
Text Only function.
b. Use the Line
Break to separate the text heading and paragraphs (Shift Enter).
Note: Do not use the paragraph break hard return.

6. Apply the class style rule .textheader to
the heading text - “Feedback”.
Highlight the text and select the
textheader class rule from the Properties panel
7. Create a Line Break by
pressing <Enter> at the end of the text paragraph
8. Create the “feedback” DIV tag
layer and insert the form.
a. Insert a DIV tag.
b. For the Insert, select “At insertion point”.
c. Enter “feedback-form”
as the ID.
d. Click on the New CSS Rule button.
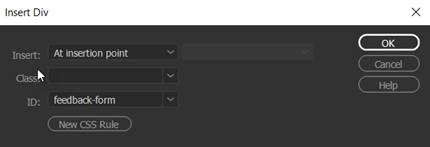
Define
the rule in this Document Only
e. Enter the following rules in the CSS Definition dialog box:
width:
450px
height: 300px
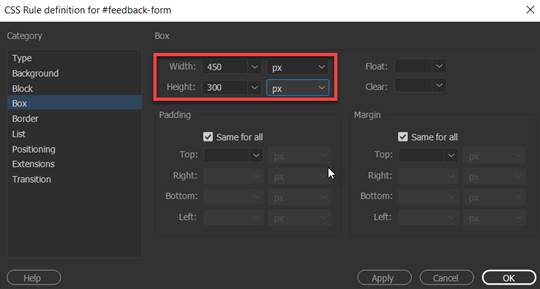
f. Click inside the “feedback-form” DIV layer.
Remove the text placeholder.
Note: Verify that the cursor pointer is inside the
DIV layer.

g. Open the
textcontent.html page and copy/ paste the form area and form elements in the
feedback-form DIV layer.
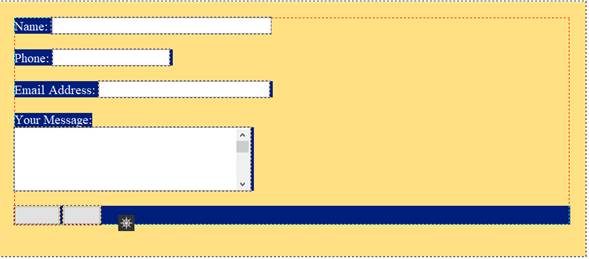
Note: To
paste, use the Edit- Paste Special- Paste as: Text with structure plus full
formatting.

9. Save
the page and style sheet. Go to the
File Menu and select “Save All”.
10. Close the page after
verifying the feedback.html matches the output below.

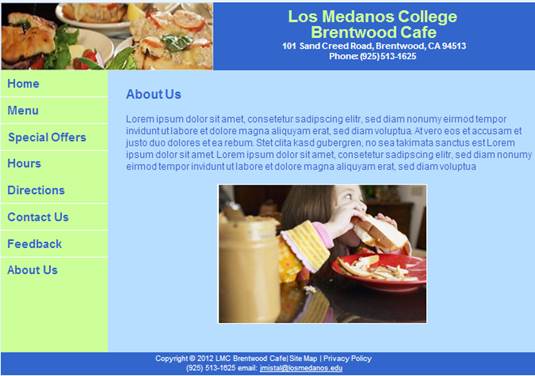
M. Create the aboutus.html page.
1. Open
the layout2.html page. Save a copy of the page as aboutus.html
2. Copy and paste the content section text from the textcontent.html
page.
a. Open the
textcontent.html page and copy/ paste the text inside the content DIV layer.
Note: To paste, use the Edit- Paste Special- Text
Only function.
b. Use the Line
Break to separate the text heading and paragraphs (Shift Enter).
Note: Do not use the paragraph break hard return.
3. Apply the class style rule .textheader to
the heading text - “About Us”.
Highlight the text and select the textheader class rule from the Properties panel
4. Create two Line
Break by pressing <Enter> at the
end of the text paragraph.
5. Create the image-center-border DIV tag layer and insert the image.
a. Verify the cursor is blinking below the paragraph.
b. Insert a DIV tag.
c. For the Insert, select “At insertion point”.
d. Enter “image-center-border”
as the ID.
e. Click on the New CSS Rule button.
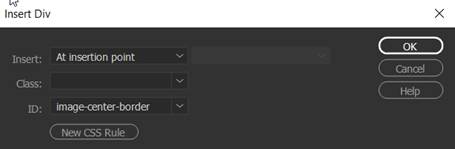
Note: Define the rule in your
external style sheet

f. Enter the following rules in the CSS Definition dialog box:
width: 350px
height:
233px
margin-right:
auto
margin-left:
auto
border:
solid 1px #FFF (all sides)

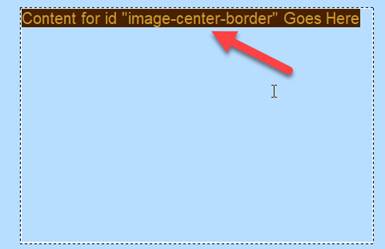
g. Click inside the “image-center-border” DIV layer.
Remove the text placeholder.
Note: Verify that the cursor pointer is inside the
DIV layer.
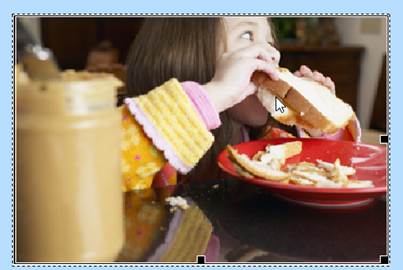
6. Insert the jpeg image file-
sandwich4.jpg in the
image-center-border DIV tag layer.
a. Click inside the “image-center-border” DIV layer.
b. From the Files Menu, Go to Insert and select Image
c. Insert sandwich4.jpg file into the DIV
layer.
7. Save the page and style sheet. Go to the File Menu and select “Save All”.
8.
Close the page after verifying the aboutus.html matches the output
below.
N. Save and Test.
1. Select File from the menu and
then Save All.
2. Test your html document. . From the File Panel, right click on the
index.html page and select Open in Browser

6.
Verify your document is complete and that it closely matches the
attached Lesson7.
Submit:
1. Zip up and compress your Lesson7 folder.
2. Upload the compressed folder into the Canvas Assignment page for Dreamweaver
Lab Lesson 7.
|
Lesson 7 Topics |
Points |
|
1. Insert nested DIV tag layers |
5 |
|
2. Create the vertical navigation menu |
10
|
|
3. Use the CSS Box Model technique |
10 |
|
4. Add and apply the layout & format style rules |
5 |
|
Total |
30 |