Dreamweaver
Lab
Lesson 5:
In
this lesson, you will be creating and completing the Web pages for the LMC
Animal Hospital site using the page template you created in Lab Lesson 2.
You
will be creating and applying the CSS rules to your HTML documents.
1. Modify the Manage Site.
2.
Create HTML documents for the Web site using the template.
3. Insert AP layer containers in the Editable region of the page template.
4,
Create the layout style rules for the AP layers.
5.
Create tag and class style rules for the elements.
6.
Apply the rules to the elements.
7.
Insert text, table and images content elements into the AP layers.
Attached is the desired output of the Web site Lesson 5 sample web site.
Prerequisites:
1. Download and extract the AssignmentLesson5.zip to the desktop
2. Unzip the folder
3. Rename the site folder to Lesson5
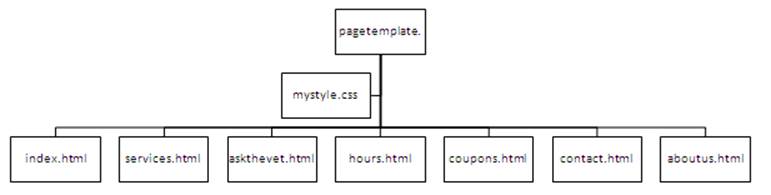
Below is the wireframe of the page template:

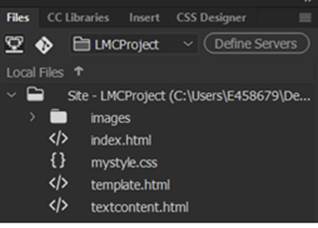
Below is the HTML document file structure:
Below are the hexadecimals values for the AP layer colors:
Layout
color
1.
AP Parent Layer: #A6C2FF
![]()
2. banner
AP Layer: #000033
![]()
3.
navigation AP Layer: #D5E3FF
![]()
4.
content AP Layer: #A6C2FF
![]()
5.
textcontent AP Layer: #D5E3FF
![]()
6.
boxcontent AP Layer: #D5E3FF
![]()
7. footer
Layer: #000033
![]()
Requirements:
A. Setup the manage site
1. From the main menu,
select Site-> New Site
2. Enter the Site Name as LMC Animal Hospital
3. Select the Local Site Folder to your
Lesson5 folder on your desktop.
4. Click Save

5. In the Files Properties panel, you
should see the folder and files.
B. Open the Home page- index.html from the
Files Panel. (Note: This has been completed in Lab Lesson 2)

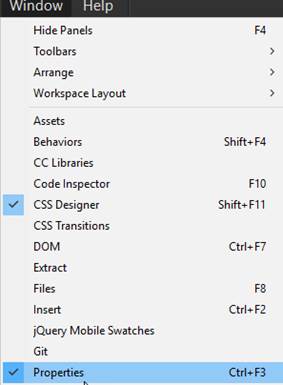
C. Open the Properties
Window
1. From the main menu,
select Windows->Properties
2. Dock the Properties
windows to the bottom of the screen

D. Create the Services
page- services.html
1. Use the template.html page to create the services.html.
a. From the
File panel, select template.html page
b. Save the
page as services.html. From the File
Menu, select Save As.
c. Verify
the cursor is in the boxcontent layer
2. Add the table content into the layer. Create and apply the class rules.
a. Open
the textcontent.html from the File Panel.
b. Copy and paste the table content
inside the boxcontent layer.

c. Toggle back to the services.html page and
verify the cursor is blinking inside the content layer. .
From the File Menu, select Edit
and then Paste Special – Text with Structure Plus Full Formatting
NOTE: Use Paste Special – Text with structure plus
full formatting

d. Merge
the rows in the last column for the image placement.
Select the rows, right click and
select Table, Merge Cells.

e. In the merge column, insert the
veterinarian2.jpg.
Note: Inserting an image will temporarily increase
the size of layer. To refresh the page, go to the Split view and back to the
Design view.

f. Create the class style rule image2 class
and define the rule in the internal CSS- This document only.
Click on the + Sources
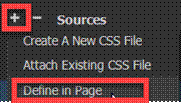
Click on the +
Selectors. Name the class
rule as image2
In the Properties window, enter and
verify the following properties/ values
margin-right: 15px
margin-left: 15px
border: 1px solid #000 (all sides)

g. Apply the .image2 class rule
to the image. Select the image and
select image2 call rule

h. Apply
the h2 format rule to the header text- “Our World Class Veterinarian Services”.
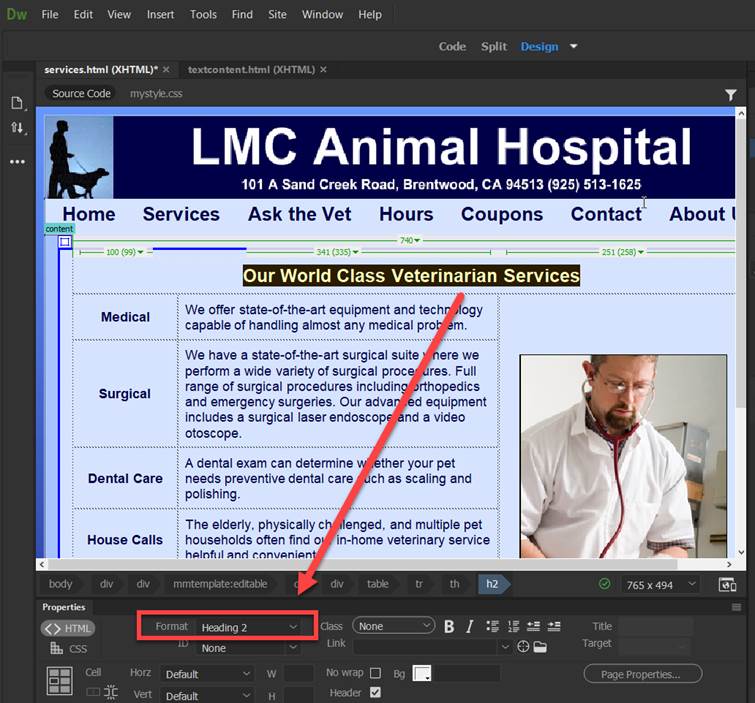
3. Verify
your document is complete and that it closely matches the page below.

4. Save your services.html page.
1. Select File from the
menu and then Save All.
2. Close the page.
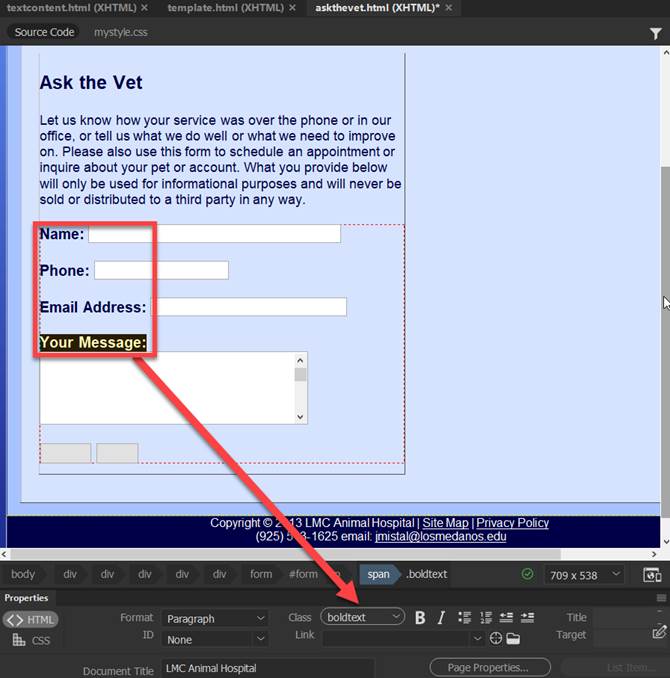
E. Create the Ask the Vet
page- askthevet.html
1. Use the template.html page to create the services.html.
a. From the
File panel, select template.html page
b. Save the
page as askthevet.html. From the File
Menu, select Save As.
c. Verify the cursor is in the boxcontent layer
2. Add the child AP layer for the form section. Copy the form
elements into the layer.
a. Insert DIV layer inside boxcontent AP layer.
b.
Select “At insertion point”
c.
Under ID, enter formcontent
d. Click on New CSS Rule

e. Under Rule Definition, select this document
only
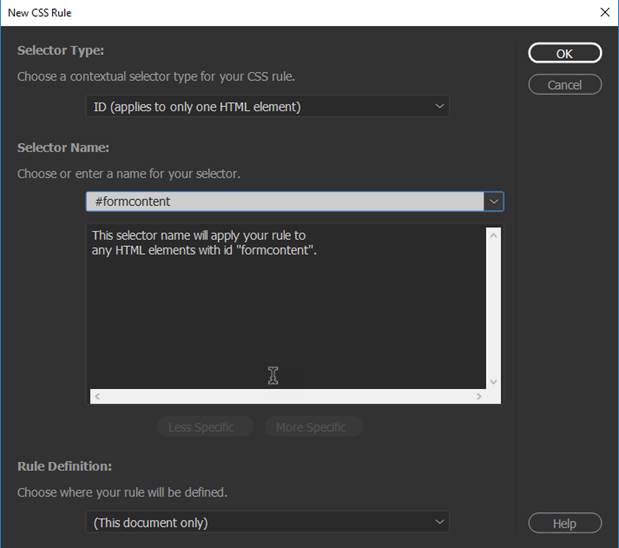
f. Enter and verify the following CSS definition rules:
position:absolute
width:390px
height:450px
top:
20px
left:
20px

g.
Delete the placeholder

h.
Open the textcontent.html in the File Panel.
Copy and paste the form elements
inside the formcontent layer.
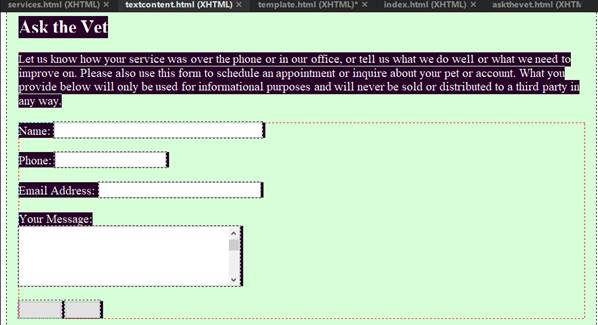
i. Toggle back to the services.html page
and verify the cursor is blinking inside the content layer. .
From the File Menu, select Edit
and then Paste Special – Text with Structure Plus Full Formatting
NOTE: Use Paste Special – Text with structure plus
full formatting
j. Apply the .boldtext class rules to the form labels. Highlight the
text and select the class rule
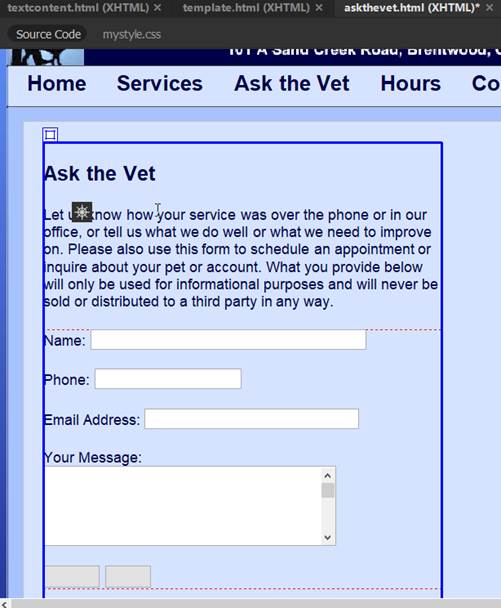
4. Add the child AP layer for the image and insert the image.
a. Insert DIV layer inside boxcontent AP layer
b. Click anywhere outside the formcontent layer
c.
Select “At insertion point”
d.
Under ID, enter imagecontent
e. Click on New CSS Rule

f. Enter and verify the
following CSS definition rules:
position:absolute
width:237px
height:350px
top:
60px
left:
460px

g.
Remove the placeholder in the imagecontent layer
h.
Insert the veterinarian3.jpg inside the imagecontent AP layer.

5. Verify
your document is complete and that it closely matches the page below.

6. Save your askthevet.html page.
1. Select File from the
menu and then Save All.
2. Close the page.
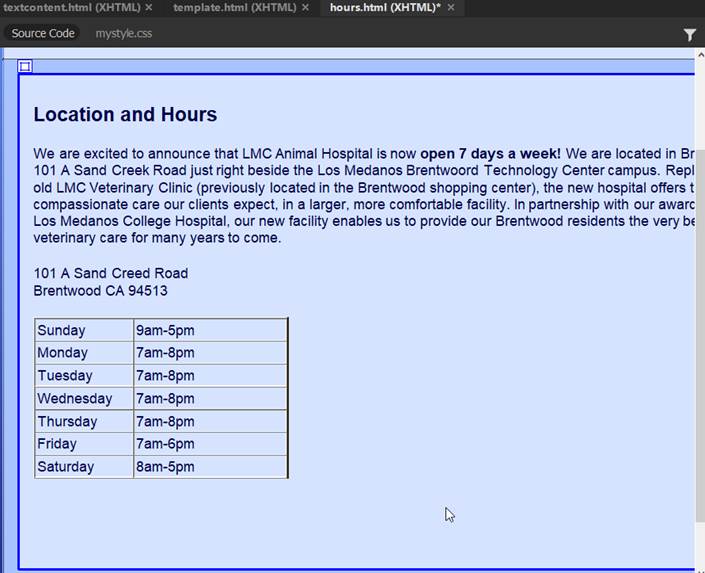
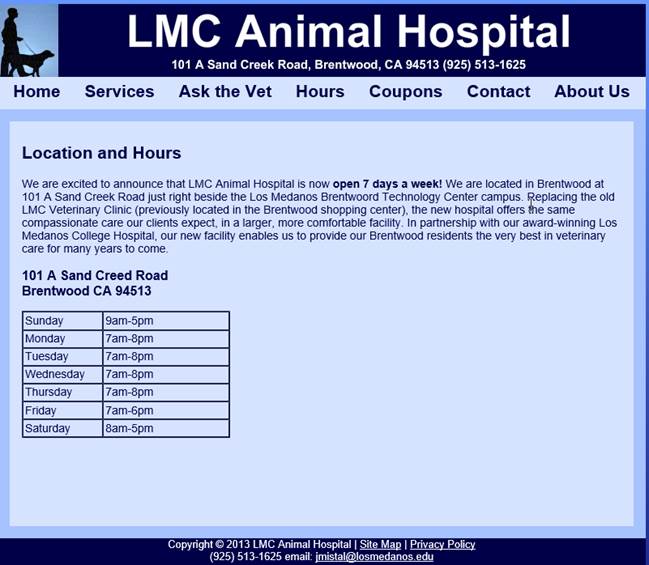
E. Create the Hours page- hours.html
1. Use the template.html page to create the hours.html.
a. From the File panel, select template.html
page
b. Save the page as hours.html. From the File Menu,
select Save As.
c. Verify the cursor is in the boxcontent layer
d. Open the textcontent.html in
the File Panel.
e.. Copy and paste the text content
inside the boxcontent layer.

f. Toggle back to the hours.html page
and verify the cursor is blinking inside the content layer. .
From the File Menu, select Edit
and then Paste Special – Text with Structure Plus Full Formatting
NOTE: Use Paste Special – Text with structure plus
full formatting
g. Apply the class rule .boldtext to the text.
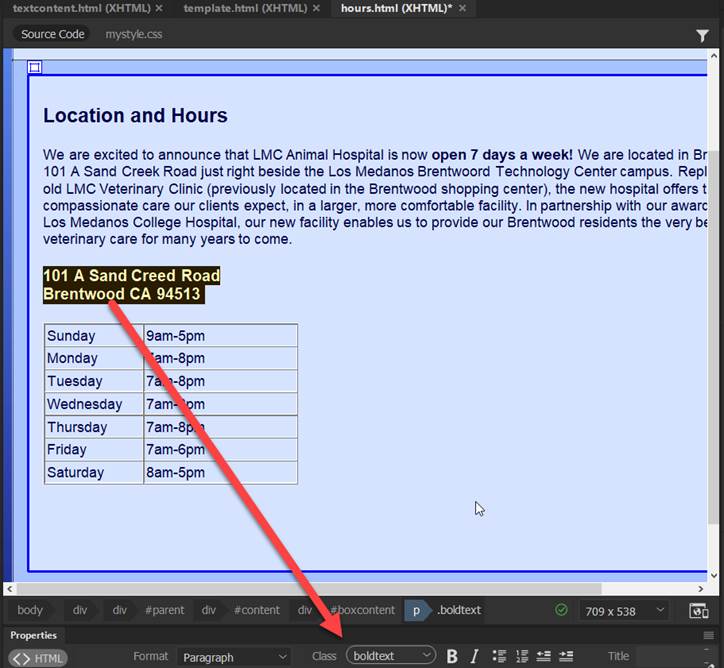
2. Verify your document is complete and that it closely
matches the page below.
5. Save your hours.html page.
1. Select File from the
menu and then Save All.
2. Close the page.
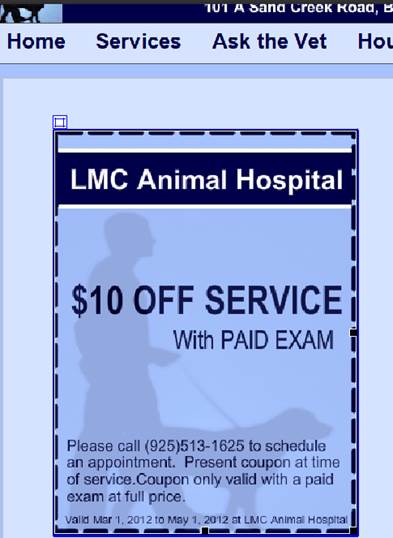
F. Create the Coupons page-
coupons.html.
1. Use the template.html page to create the hours.html.
a. From the File panel, select template.html
page
b. Save the page as coupons.html. From the File Menu,
select Save As.
c. Verify the cursor is in the boxcontent layer
2. Add the child AP layer for the coupon1.jpg image.
a. Insert a DIV inside
the parent AP boxcontent layer.
b. In the Properties inspector, enter
“coupon1” as the ID.

c. Enter and verify the
following CSS definition rules:
position:absolute
width:300px
height:400px
top:
50px
left:
50px

d. Remove the
placeholder and then insert the coupon1.jpg into the layer and add an
alternative text.

e. Insert a DIV inside
the parent AP boxcontent layer.
f. In the Properties inspector, enter
“coupon1” as the ID.
g. Enter and verify the
following CSS definition rules:
position:absolute
width:300px
height:400px
top:
50px
left:
50px

h. Remove the placeholder
and then insert the coupon1.jpg into the layer and add an alternative text.
3. Add the child AP layer for the coupon2.jpg image.
a. Insert a DIV inside
the parent AP boxcontent layer.
b. In the Properties inspector, enter
“coupon2” as the ID.

c. Enter and verify the
following CSS definition rules:
position:absolute
width:300px
height:400px
top:
25px
left:
400px

d. Remove the
placeholder and then insert the coupon2.jpg into the layer and add an
alternative text.

5. Move and position the child AP layers.
6. Add the header text
a. Insert the text – Coupons and apply the
.boldtext class rule.
b.
Insert a line break by press <shift><enter>.
c. Inert the text –
(click on Coupons below to print).
7. Verify your document is complete and that it closely
matches the page below.

8. Save your coupons.html page.
1. Select File from the
menu and then Save All.
2. Close the page.
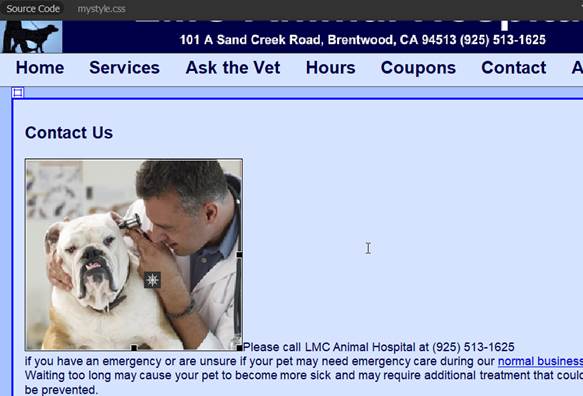
G. Create the Contact page-
contact.html.
1. Use the template.html page to create the hours.html.
a. From the File panel, select template.html
page
b. Save the page as contact.html. From the File Menu,
select Save As.
c. Verify the cursor is in the boxcontent layer
d. Open the textcontent.html in
the File Panel.
e.. Copy and paste the text content
inside the boxcontent layer.
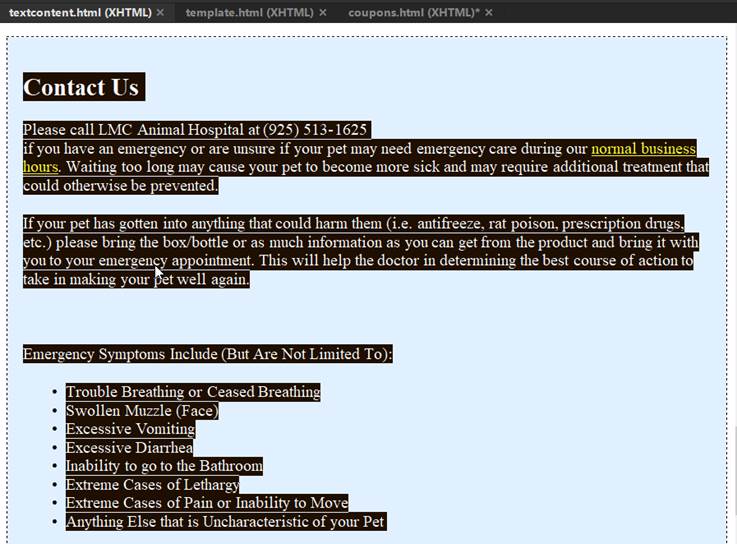
f. Toggle back to the contact.html page
and verify the cursor is blinking inside the content layer. .
From the File Menu, select Edit
and then Paste Special – Text with Structure Plus Full Formatting
NOTE: Use Paste Special – Text with structure plus
full formatting

3. Insert the image and apply a class rule to the image.
a. Insert the veterinarian4.jpg image in the boxcontent layer.
b. Create a new class style
rule called “image4” and define the rule in the internal CSS- This document
only.
c. Enter the following
style rules for .image4 class in the CSS Definition dialog box:
float: left
margin-top: 10px
margin-right:
20px
margin-left: 10px
margin-bottom: 10px
border: 1px solid
#000; (all
sides)

d. Apply .image4 class
rule to the image.
NOTE: This class rule will float
the image to the right and add 20 px to right margin of the image.

5. Verify your document is complete and that it closely
matches the page below.
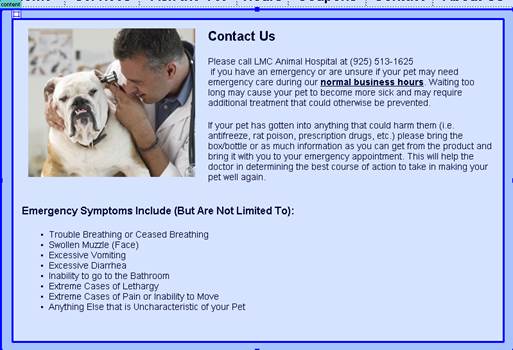
6. Save your contact.html page.
1. Select File from the
menu and then Save All.
2. Close the page.
H. Create the About Us
page- aboutus.html.
1. Use the template.html page to create the aboutus.html.
a. From the File panel, select template.html
page
b. Save the page as aboutus.html. From the File Menu,
select Save As.
c. Verify the cursor is in the boxcontent layer
d. Open the textcontent.html in
the File Panel.
e.. Copy and paste the text content
inside the boxcontent layer.

f. Toggle back to the contact.html page
and verify the cursor is blinking inside the content layer. .
From the File Menu, select Edit
and then Paste Special – Text with Structure Plus Full Formatting
NOTE: Use Paste Special – Text with structure plus
full formatting
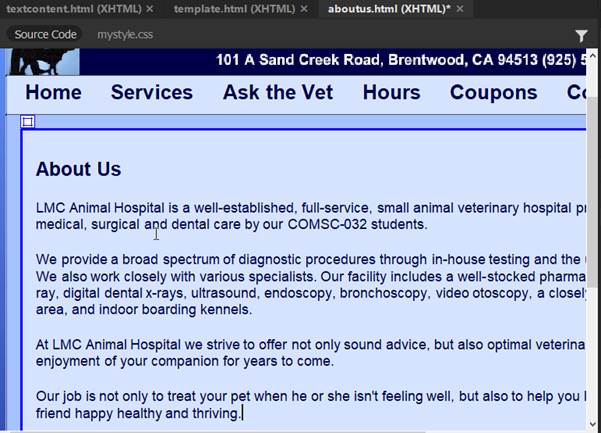
4. Insert the image and apply a class rule to the image.
a. Insert the veterinarian5.jpg image in the boxcontent layer.
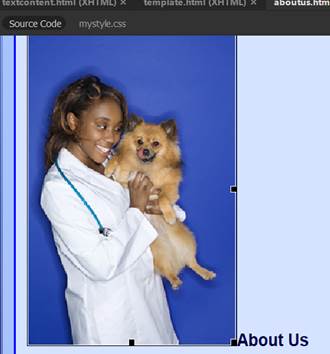
b. Create a new class
style rule called “image5” and define the rule in the internal CSS.
c. Enter the following
style rules for .image5 class in the CSS Definition dialog box:
float: right
margin: 15px (all sides)
border: 1px solid #000 (all sides)

d. Apply .image5 class rule to the
image.

5. Verify your document is complete and that it closely
matches the page below.
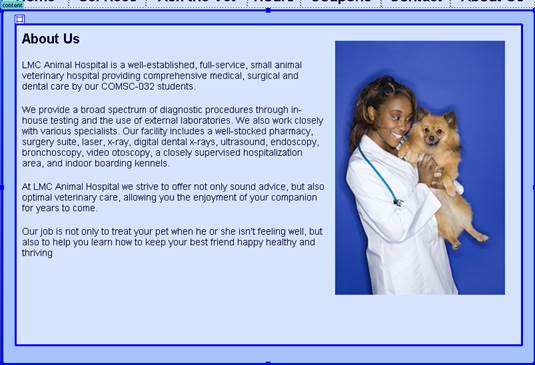
6. Save your aboutus.html page.
1. Select File from the
menu and then Save All.
2. Close the page.
Test:
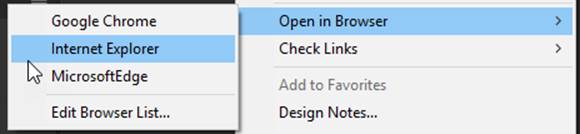
1. Open the index.html
page.
Right click and select Open in
Browser->Internet Explorer
2. Test the navigation menu. Verify all the links are working.
3. Verify your document is complete and that it closely matches the attached Lesson 5 sample web site.
Submit:
1. Zip up and compress your Lesson5 folder.
2. Upload the compressed folder into the Canvas- Dreamweaver Lab Assignement 5
Drop Box.
|
Lesson 5 Topics |
Points |
|
1. Create HTML documents using the template. |
2 |
|
2. Insert AP layers containers |
5 |
|
3. Create layout style rules for the AP layers. |
10 |
|
4. Create class style rules & apply to elements. |
10 |
|
5. Insert text, table, images & SWF into AP |
3 |
|
Total |
30 |