Adobe Animate and Dreamweaver
Lab Lesson 3:
In
this lesson, you will be creating the page layout using AP (Absolute
Position) layers and then creating the index.html for the LMC Vacation
Tours and Travel Agency site.
You will then use the template to create the home page- index.html.
1. Setup a manage site.
2.
Create a new HTML document.
3. Create and attach the external style sheet to the HTML document.
4. Insert a wrapper DIV tag to center the page.
5.
Insert a parent AP layer container
6.
Create and apply the layout style rule for the parent AP layer.
7.
Insert the child AP layer containers.
8. Create and apply the layout style rules for the child AP layers.
9.
Insert a table and create the style rules for the navigation menu.
10.
Insert SWF, images and text content into the layers.
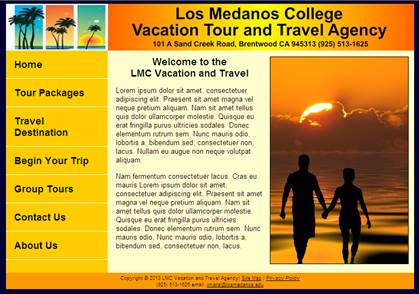
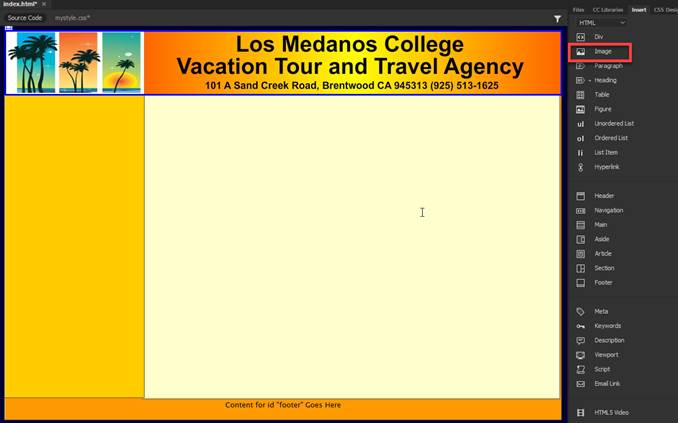
Attached is the desired page template output Lesson 3 output page.
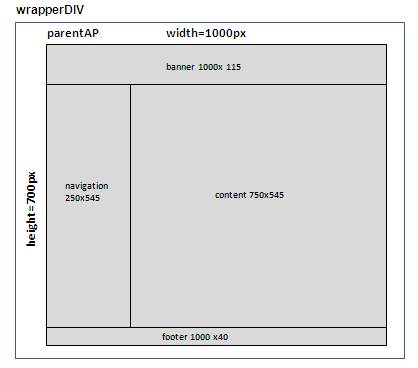
Below is the wireframe of the page layout:
Below is the font color for the page body: #000
![]()
Below is the background color for the page body: #003
![]()
Below are the hexadecimals values for the AP layer colors:
1.
wrapper DIV: #F90
![]()
2.
parent AP Layer: #F90
![]()
3. banner
AP Layer: #FF9900
![]()
4.
navigation AP Layer: #FFCC00
![]()
5.
content AP Layer: #FFC
![]()
6. footer
Layer: #FFCC00
![]()
Install Adobe Creative Cloud:
See email on how to your Canvas inbox for temporary access to Creative Cloud
Desktop Apps for Education
Prerequisites:
1.
Detach and unzip the Lesson 3 Assignment files.
2. Place and drag the Lesson 4 folder that contain files on your Desktop. Verify that all your image files are in the
image folder
Requirements:
A. Setup the manage site
1. From the main menu,
select Site-> New Site
2. Enter the Site Name as LMC Vacation Tour and Travel Agency”
3. Select the Local Site Folder to your Lesson3
folder on your desktop.
4. Click Save

5. In the Files Properties panel, you
should see the folder and files.

B. Create an external CSS
file
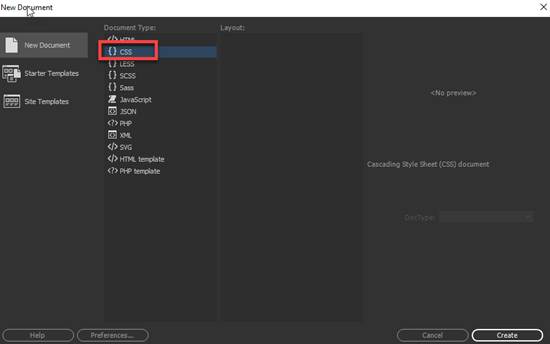
1. From the main menu, select File->New Document
2. Select CSS as the Document Type
3. Click on Create
4. From the main menu, select File-> Save As. Save the CSS document as “mystyle.css” page in the root of your
Lesson4 folder
C. Create an HTML document
and attached the external style sheet
1. From the main menu, select File->New Document
2. Enter the Title as “LMC Vacation Tour and Travel Agency”
3. Attached the external style you created.
Click on the attach button (see red arrow) and
locate the mystyle.css from your folder.
Click OK.

4. Click on Create

4 Save the html file as layout.html. From the main menu, select File->Save
As
D. Configure the body tag rule.
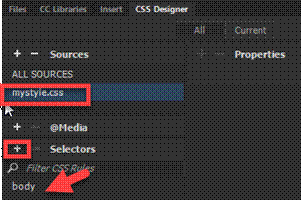
1. Create a new CSS rule.
Go to the CCS Designer Panel. If
panel is not open, from the File Menu, select Window-> CCS Designer

2. Select mystyle.css as
the Source
3. Click on the + icon
in the Selectors section.
4. Type body for CCS
tag rule
5. From the Properties
Panel, select and verify the following rules in the category
a. Select the Text properties. Add
the following text properties and values (circled in red)
color: #000;
font-family:
"Lucida Grande", "Lucida Sans Unicode", "Lucida
Sans", "DejaVu Sans", Verdana, sans-serif;
font-size: 16px;

b.
Select the Background properties:
background-color: #003;

E. Create the wrapper DIV tag layer which will be use to center the page.
1. Insert a DIV tag. From
the Insert Panel, select DIV
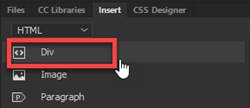
2. For the Insert, select “At
insertion point”
3. Enter “wrapperDIV” as
the ID.
4. Click on New CSS rule.
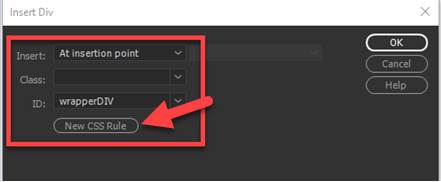
4. Define the rule in your external CSS file-
mystyle.CSS (circled in red)
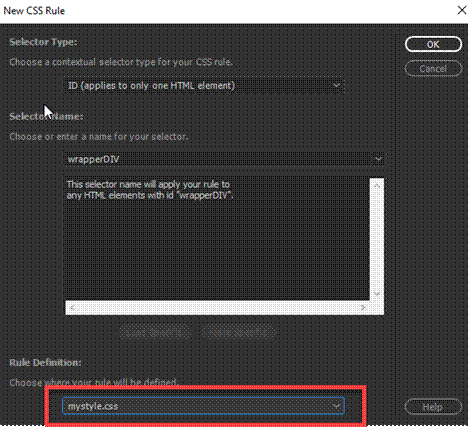
5. Enter the following rules in the Box category: Once the rules are entered, click OK
width: 1000px
height: 700px
margin-right: auto
margin-left: auto
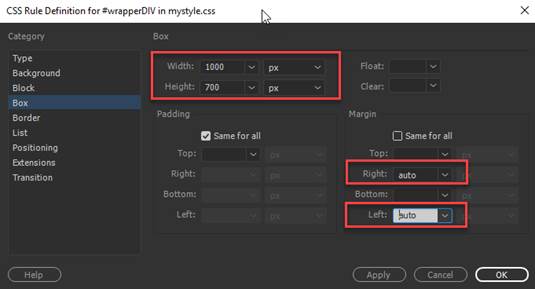
6. Enter the following rule in the Background category
background-color: #F90
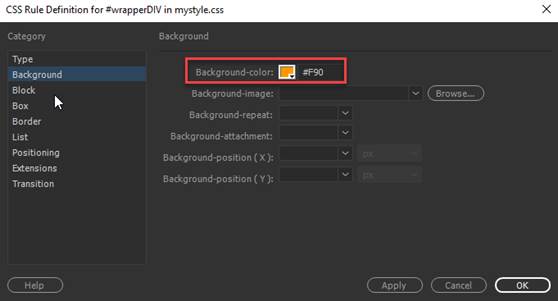
7. Verify the rules were
entered correctly. After adding the rules
above, click on OK
8. Delete the
text placeholder in the DIV container you created before proceeding.
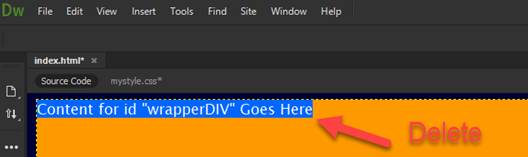
NOTE: Before you proceed, you
will need to delete the text placeholder in the DIV layer (see step D6).
F. Create the AP (Absolute
Position) parent container
1. Verify the cursor is
blinking inside the wrapperDIV layer you create above
2. Insert a DIV tag. From the Insert Panel, select DIV.
3. For the Insert, select “At
insertion point”
4. Enter “parentAP”
as the ID.
5. Click on New CSS rule
button

6. Define the rule in your external
CSS file- mystyle.CSS (circled in red)

7. Enter and verify the following rules in the Positioning category
position:absolute
width:1000px
height:700px

8. Enter the following rule in the Background category
background-color: #F90

9. Verify the rules were
entered correctly. After adding the
rules above, click on OK button
10. Delete
the text placeholder in the DIV container you created before proceeding.

NOTE: Before you proceed, you
will need to delete the text placeholder in the DIV layer above (see red arrow)
G. Create the AP (Absolute Position)
child container for the company banner image
1. Click inside the
parentAP layer.
Note:
The guide at the bottom should show this
![]()
2. Insert a DIV tag. From the Insert Panel, select DIV.

3. For the Insert, select “After start
of tag” <div
id= “parentAP”>
4. Enter “banner”as the ID.
5. Click on New CSS rule
button

6. Define the rule in your
external CSS file- mystyle.CSS (circled in red)
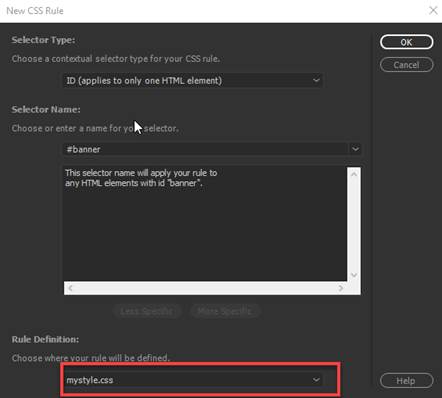
7. Enter and verify the
following rules in the Positioning category:
position:absolute
width:1000px
height:115px
left: 0px
top: 0px

8. Enter the following rule in the Background
category
background-color: #FF9900

9. Verify the rules were
entered correctly. After adding the
rules above, click on OK button
10. Delete
the text placeholder in the DIV container you created before proceeding.

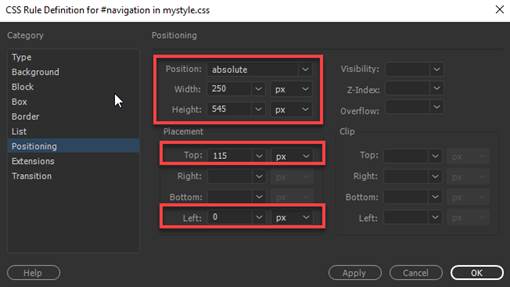
H. Create the AP (Absolute
Position) child container for the navigation menu section
1. Click inside the
parentAP DIV layer.
Note:
The guide at the bottom should show this.
![]()
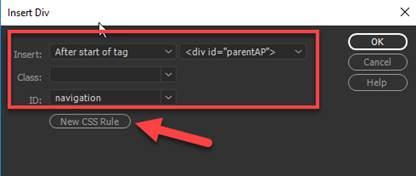
2. Insert a DIV tag. From the Insert Panel, select DIV.
3. For the Insert, select “After start
of tag” <div
id= “parentAP”>
4. Enter “navigation” as the
ID.
5. Click on New CSS rule.
6. Define the rule in your
external CSS file- mystyle.CSS (circled in red)

7. Enter and verify the following rules in the Positioning
category:
position: absolute
width:250px
height:545px
left: 0px
top: 115px
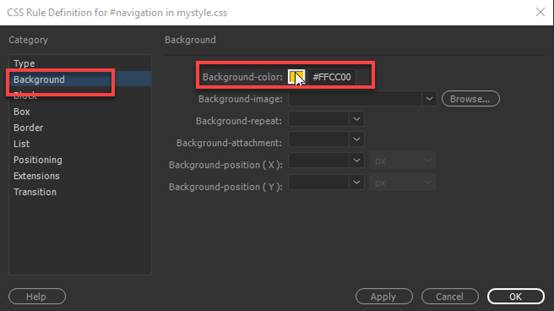
8. Enter the following rule in the Background
category
background-color:
#FFCC00
9. Verify the rules were
entered correctly. After adding the
rules above, click on OK button
10. Delete
the text placeholder in the DIV container you created before proceeding.

NOTE: Before you proceed, you
will need to delete the text placeholder in the DIV layer above (see red arrow)
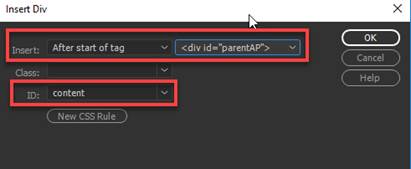
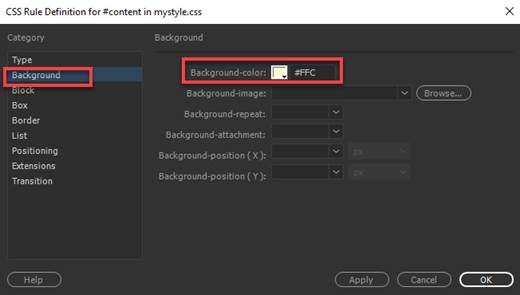
I. Create the AP (Absolute Position) child container for the
content section
1. Click inside the
parentAP DIV layer. Make sure you are
NOT in the navigation layer
Note:
The guide at the bottom should show this
![]()
2. Insert a DIV tag. From the Insert Panel, select DIV.
3. For the Insert, select “After start
of tag” <div
id= “parentAP”>
4. Enter “content”as the ID.
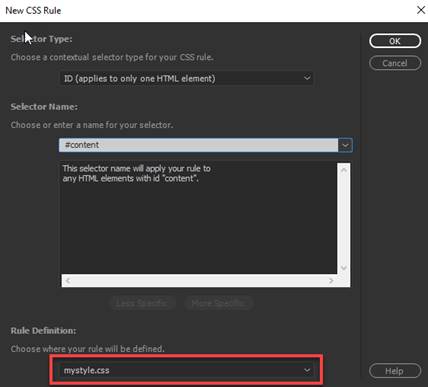
5. Click on New CSS rule.
6.. Define the rule in your
external CSS file- mystyle.CSS (circled in red)
6.. Enter and verify the following rules in the Positioning
category:
position:absolute
width:750px
height:545px
left: 250px
top: 115px

7.. Enter and verify the following rules in the Background
category:
background-color: #FFC
9. Verify the rules were
entered correctly. After adding the rules
above, click on OK button
10. Delete
the text placeholder in the DIV container you created before proceeding.

NOTE: Before you proceed, you
will need to delete the text placeholder in the DIV layer above (see red arrow)
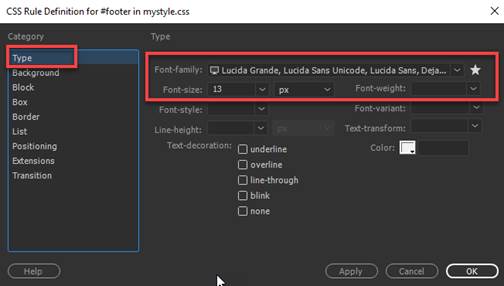
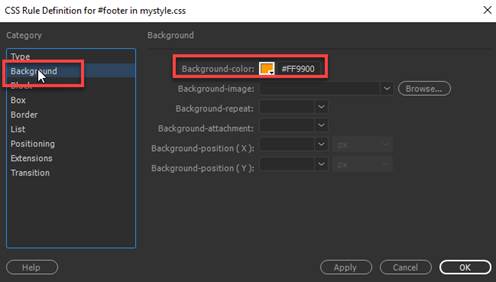
J. Create the AP (Absolute
Position) child container for the footer section.
1. Click inside the
parentAP DIV layer. Make sure you are
NOT in the navigation layer
Note:
The guide at the bottom should show this
![]()
2. Insert a DIV tag. From the Insert Panel, select DIV.

3. For the Insert, select “After start
of tag” <div
id= “parentAP”>
4. Enter “footer”as the ID.
5. Click on New CSS rule.
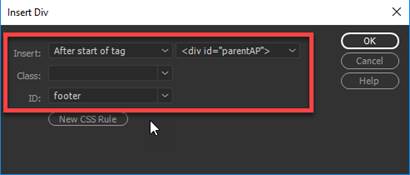
6. Define the rule in your external
CSS file- mystyle.CSS (circled in red)

7. Enter and verify the following rules in the Positioning
category:
position:absolute
width:990px
height:30px
left: 0px
top: 660px

8.. Enter and verify the following rules in the Type category:
font-family; Lucida Grande, Lucida Sans Unicode,
Lucida Sans
font-size: 13px
9. Enter and verify the following rules in the Background
category:
background-color:
#FF9900
10. Enter and verify the following rules in the Block
category:
text-align: center

11. Enter and verify the following rules in the Box category:
padding: 5px (all sides)

12. Verify the rules were entered
correctly. After adding the rules above,
click on OK button
13. Delete
the text placeholder in the DIV container you created before proceeding.
![]()
NOTE: Before you proceed, you
will need to delete the text placeholder in the DIV layer above (see red arrow)
K. Insert the image companylogo.jpg inside the banner AP DIV layer.
1. Click inside the banner layer
2. Go to the Insert Panel and select Image
3. Insert the banner.jpg
from your images folder
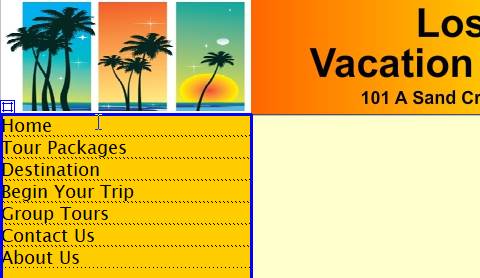
L. Create a table for the navigation menu in the navigation
AP DIV layer.
1. Click inside the navigation layer.
2. Go to the Insert Panel and select Table
3. Insert a table with the following dimensions.
rows= 7
columns= 1
table width =100%
border thinkness=
0
cell padding= 0
cell spacing= 0

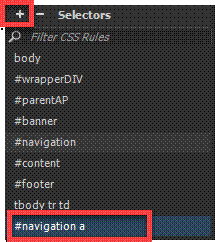
M. Add a new compound CSS rule for the navigation layer
anchor tag (hyperlink):
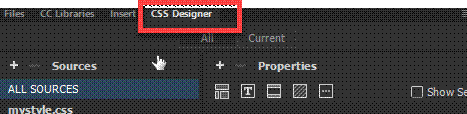
1 Create a new CSS rule.
Go to the CCS Designer Panel. If panel
is not open, from the File Menu, select Window-> CCS Designer

2. Select mystyle.css as
the Source
3. Click on the + icon in
the Selectors section.
4. Type #navigation a for CCS tag rule
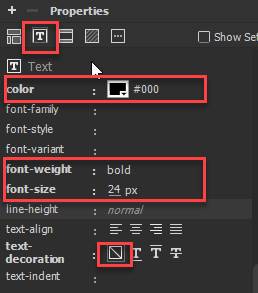
5. Add the following style rules for the #navigation a in the Properties Panel
a. Enter and verify the following rules in the Text Properties category:
font-size: 24px
color: #000
font-weight: bold
text-decoration: none
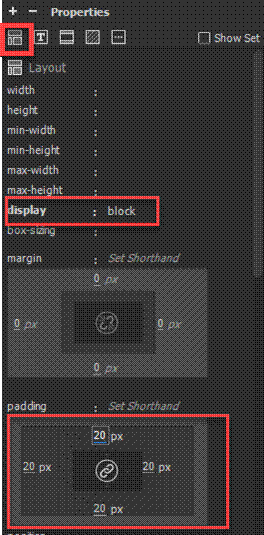
b. Enter and verify
the following rules in the Layout Properties category:
display: block
padding: 20px; (all sides)
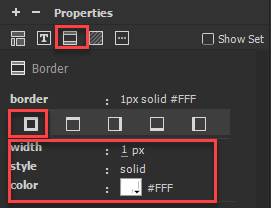
c. Enter and verify the following rules in the Border Properties category:
border-bottom-width: 1px
border-bottom-style: solid
border-bottom-color: #FFF
N. Add a new compound CSS rule for the navigation layer
anchor tag hover (hyperlink):
1. Create a new CSS rule.
Go to the CCS Designer Panel. If panel
is not open, from the File Menu, select Window-> CCS Designer

2. Select mystyle.css as
the Source
3. Click on the + icon in the
Selectors section.
4. Type #navigation a:hover for CCS tag rule
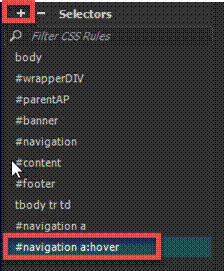
5. Add the following style rules for the #navigation a
hover in the Properties Panel
a. Enter and verify the following rules
in the Text Properties category:
color: #FFF

a. Enter and verify the following rules in the Background Properties category:
background-color: #003

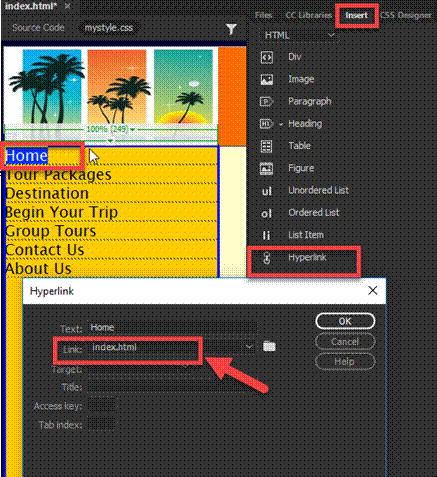
O. Enter the text and corresponding hyperlinks in the table
cells for the navigation menu.
1.
Insert the following text for navigation menu in the table cells.
2. In the Properties
panel, insert the hyperlinks for the text link.
Highlight the text. From the Insert Panel, select Hyperlink. Enter the name of the link (see red arrow) and click
OK
Home index.html
Tour Packages packages.html
Travel Destination destination.html
Begin Your Trip trip.html
Group Tours group.html
Contact Us contact.html
About Us aboutus.html
P. Enter the text content in the footer AP DIV layer.
1. Copy and paste the following text in the footer
layer.
a.
Click inside the Footer Layer
b.
Copy the footer text below
c.
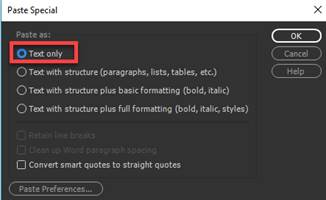
From the main menu, select Edit-> Paste
Note: Use Paste Special- Text Only. Use a line break to have the phone and email
address to display on separate line.
Place cursor and press shift + enter for a line break
Copyright © 2013 LMC
Vacations Tours and Travel Agency | Site Map | Privacy Policy
(925) 513-1625 email:
john.doe@losmedanos.edu
2.
Add the text hyperlink for the following links:
a. Site Map:
sitemap.html
b. Privacy Policy: policy.html
NOTE: Highlight the text. From the Insert
Panel, select Hyperlink. Enter the name of the link (see red arrow) and click
OK
![]()
Q. Save your mystyle.css and layout.html page.
1. Select File from the
menu and then Save All.
2. Close the layout.html
and mysytle.css
R. Create the Home page- index.html and insert
the content elements.
1. Use the layout.html to create the
index.html.
a. Open the layout.html page
b. Select File and then Save As “index.html”
S. Create the AP (Absolute Position) child container for the animate
canvas file
1. Click inside the content
DIV layer. Make sure you are NOT in the
navigation layer
Note:
The guide at the bottom should show this
![]()
2. Insert a DIV tag. From the Insert Panel, select DIV.

3. For the Insert, select “After start
of tag” <div
id= “animate”>
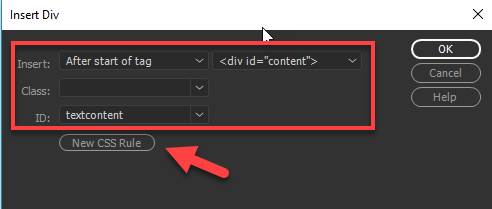
4. Enter “animate”as the ID.
5. Click on New CSS rule.
6.. Define the rule as an
internal CSS – This document only (circled in red)
7.. Enter and verify the following rules in the Positioning
category:
position:absolute;
width:340px
height:510px
left: 400 px
top: 15px
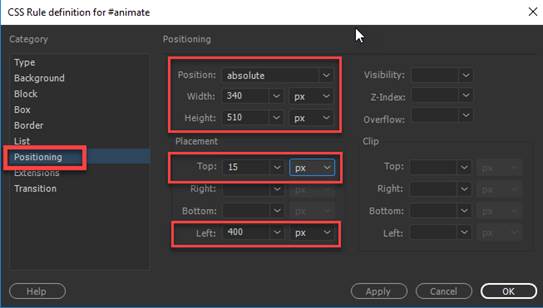
8. Verify the rules were
entered correctly. After adding the
rules above, click on OK button
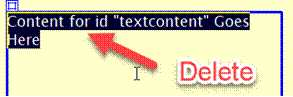
9. Delete the
text placeholder in the DIV container you created before proceeding.

10. Verify the cursor is blinking insert the Animate layer
11. From the Insert Panel,
select Animated Composition.
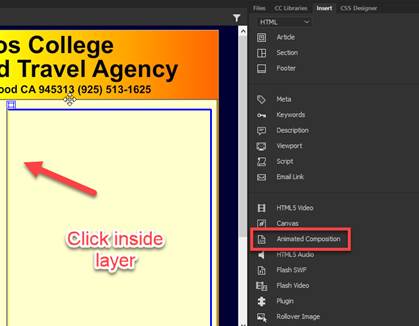
12. Select OAM
beachphoto.oam from the folder

T. Create the AP (Absolute Position) child container for the text
section
1. Click inside the content DIV layer. Make sure you are NOT in the navigation layer
Note:
The guide at the bottom should show this
![]()
2. Insert a DIV tag. From the Insert Panel, select DIV.
3. For the Insert, select “After start
of tag” <div
id= “animate”>
4. Enter “textcontent”as the ID.
5. Click on New CSS rule.
6.. Define the rule as an
internal CSS – This document only (circled in red)

7.. Enter and verify the following rules in the Positioning
category:
position: absolute
width:330px
height:515px
left:
20px
top:
15px

8. Verify the rules were
entered correctly. After adding the
rules above, click on OK button
9. Delete the
text placeholder in the DIV container you created before proceeding.
U. Insert
the text content and create and apply a class rule to the image.
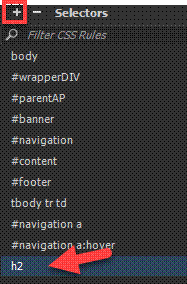
1. Create a new CSS rule
for the h2 tag
a.
Go to the CCS Designer Panel.
If panel is not open, from the File Menu, select Window-> CCS
Designer
b. Select mystyle.css as
the Source
c. Click on the + icon
in the Selectors section.
d. Type h2 for CCS
tag rule
e. Create a tag rule for the h2 and define
the rule in the external CSS.
font-family:
"Lucida Grande", "Lucida Sans Unicode", "Lucida
Sans", "DejaVu Sans", Verdana, sans-serif;
font-size: 22px
font-weight: bold
text-align: center
margin: 0px (all sides)

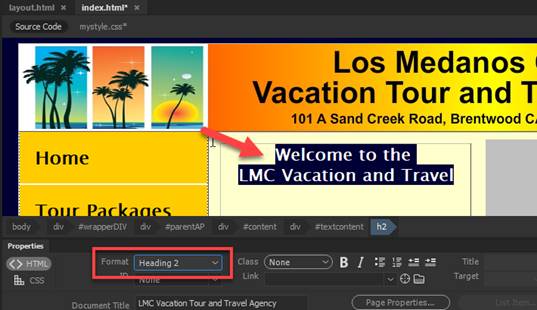
2..
Inside the textcontent layer, type the following header text. Use line break to
separate the line.
Welcome to the
LMC Vacation and Travel
3.. Open the Properties Windows. From the main menu, select Windows->
Properties
Highlight the text and select Heading 2 for
Format in the Properties window
4.. Insert the text placeholder in the
textcontent layer by copying and pasting,
Note:
Use line break to separate the placeholder text by placing cursor and
press <shift><enter>
|
Lorem
ipsum dolor sit amet, consectetuer adipiscing elit. Praesent sit amet magna
vel neque pretium aliquam. Nam sit amet tellus quis dolor ullamcorper
molestie. Quisque eu erat fringilla purus ultricies sodales. Donec elementum
rutrum sem. Nunc mauris odio, lobortis a, bibendum sed, consectetuer non,
lacus. Nullam eu augue non neque volutpat aliquam. Nam
fermentum consectetuer lacus. Cras eu mauris Lorem ipsum dolor sit amet,
consectetuer adipiscing elit. Praesent sit amet magna vel neque pretium
aliquam. Nam sit amet tellus quis dolor ullamcorper molestie. Quisque eu erat
fringilla purus ultricies sodales. Donec elementum rutrum sem. Nunc mauris
odio, Nunc mauris odio, lobortis a, bibendum sed, consectetuer non, lacus. |
V. Save and close the index.html and mystyle.css
1. Select File from the
menu and then Save All.
Test:
1. Preview your web page by
right clicking on index.html from the File Panel and select Open in Browser.

2. Verify your document is complete and that it closely
matches the attached Lesson 3
output page.

Submit:
1. Zip up and compress your Lesson3 folder.
2. Upload the compressed folder into Canvas Dreamweaver Lab Assignement 3
|
Lesson 3 Topics |
Points |
|
1. Insert a DIV tag to center the page. |
5 |
|
2. Add the AP parent and child layers. |
5 |
|
3. Apply the style rules for the AP Layers. |
5 |
|
4. Create the navigation menu using a table. |
5 |
|
5. Create the style rules for the table. |
5 |
|
6. Insert SWF, text content and footer. |
5 |
|
Total |
30 |