Adobe Create Cloud- Dreamweaver
Lesson 1:
In
this lesson, you will be performing the following steps:
1.
Setup a manage site
2. Attaching an external cascading style sheet (CSS) to a Web page
3. Adding the title to the Web page.
4. Inserting a Animate Composition
5. Inserting images.
6. Adding text hyperlinks in the navigation menu
7. Applying a class rule
Install Dreamweaver from the Adobe Creative Cloud Desktop:
![]()
Prerequisites:
1.
Detach and unzip the Lesson 1 Assignment files.
2. Place and drag the Lesson 1 folder that contain files on your Desktop. Verify that all your image files are in the
image folder.
Desired Output:
See attached sample output- Lesson 1
output web page.
Requirements:
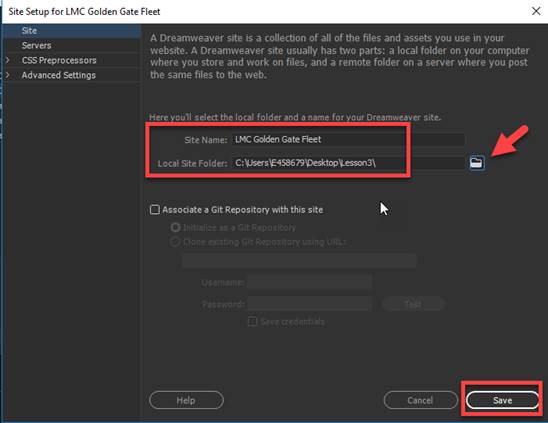
A. Setup the manage site
1. From the main menu,
select Site-> New Site

2. Enter the Site Name as
“LMC Golden Gate Fleet”
3. For the Local Site Folder, click on
Browse and select the Lesson3 folder on your desktop.
4. Click Save
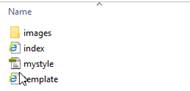
5. Access the File Panel
(Press F8) and verify if you see the folder and files below
NOTE: The File Panel can be accessed
also from main menu and selecting Windows-> Files

B. Dock the Properties Panel at the bottom of
the screen
1. From the File menu,
select Windows-> Properties or press <Ctrl><F3>
![]()
2. Move the Properties Panel at the bottom of the
screen to dock it.

C. Attached the external Cascading Style Sheet
(CSS) to the index.html page
1. From the File Panel, select and open index.html
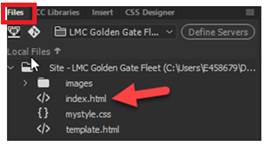
2. Click on the Design Mode
NOTE: You can toggle between the 3
modes - Code, Split and Design.

3. Access the CSS Designer Panel
(Press Shift + F11)
NOTE: The CCS Designer Panel can be
access also from main menu and selecting Windows-> CSS Designer
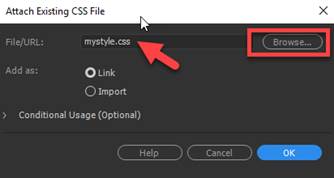
4. Click on the + sign icon and select Attach Existing CSS
File

5. Click on Browse button and locate the mystyle.css in your
Lesson3 folder and click OK
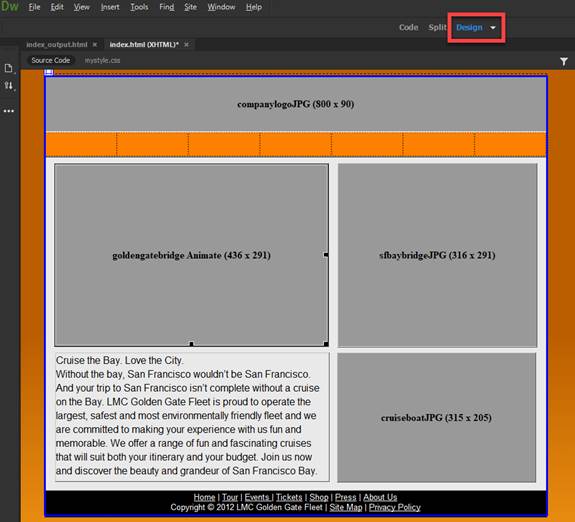
NOTE: Once the external
style sheet is link, below is what gets displayed in Design Mode
D. Insert the images on the
html document
1. Replace the companylogJPG (800
x90) placeholder with the companylogo.jpg located in the images folder.
a. In the
banner layer, select the companylogJPG (800 x 90) placeholder. Then press the delete
button on the keyboard to remove

b. Click inside the banner layer. You should see the cursor blinking in the
layer

c.
Access the Insert
Panel (Press Ctrl F12) or from the main
menu, select Windows->Insert
d.
Click on the Image

e. Select the companylog.jpg and click OK
f.
Below is image that should show in the banner layer

2. Replace the sfbaybridgeJPG (316
x 291) placeholder with the sfbaybridge.jpg located in the images folder.
Follow steps #D1a -1f above to insert
the image
3. Replace
the cruiseboatJPG (315 x 205) placeholder with the cruiseboat.jpg locatedin the
images folder.
Follow steps #D1a -1f above to insert
the image

E. Insert the Animate Composition
1. In the AnimateProject1.oam (436 x 291)
placeholder, select the placeholder and press the delete button on the keyboard
to remove

2. Click inside the AnimateProject1 layer.
You should see the cursor blinking in the layer

c.
Access the Insert
Panel (Press Ctrl F12) or from the main
menu, select Windows->Insert
d.
Scroll down and click on the Animated
Composition

e. Select the AnimateProject.oam and click OK. Select Flash for
the Title and click OK
f.
Below is the what shows up in the layer. Click inside the layer and adjust
the W= 436 and H=291 in the Properties panel

F. Add the relative text
hyperlinks in navigation menu
1.
Add the text below inside the table cells of the navigation menu.

2. Add the hyper link. Highlight the
text - Home. Access the Insert Panel
(Press Ctrl F12) and click on Hyperlink
Type index.html and click OK
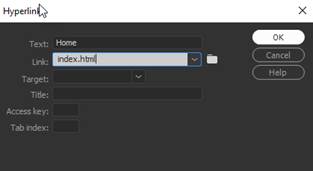
3.
Follow step #F2 for the add the rest of the hyperlinks
Home -
index.html
Tour - tour.html
Events – events.html
Tickets – tickets.html
Shop – shop.html
Press – press.html
About – about.html
G. Apply a class rule to a
text element
1.
Open the Properties
Panel.
From the main menu, select Windows-> Properties or press Ctrl + F3

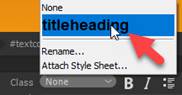
2. Highlight the title text

3. On the Properties Panel, for the Class, select
“titleheading”
Test:
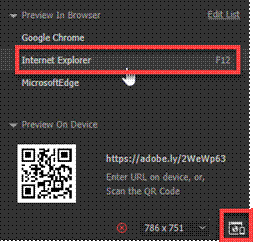
1. Preview your web page by
clicking on the Preview button or press F12.
2. Verify
your document is complete and that it closely matches the attached Lesson 3 output web page.
3. Save your web page as index.html.

Submit:
1. Zip up and compress your Lesson1 folder.
2. Upload the compressed folder into the Canvas– Dreamweaver Lab Assignment 1 drop
box.
|
Lesson 1 Topics |
Points |
|
1. Attaching an external CSS |
5 |
|
2. Adding the title to the Web page |
5 |
|
3. Inserting images |
5 |
|
4. Inserting a SWF file |
5 |
|
5. Adding text hyperlinks in the navigation menu |
5 |
|
6. Applying a class rule |
5 |
|
Total |
30 |