Animate Lab Exercise #6: Working with
Layers
Prerequisites:
1. Create a folder on your desktop called chapter6.
2. Detach and unzip the chapter6
image file folder. Place the image file folder inside the chapter6folder.
Part 1 Requirements:
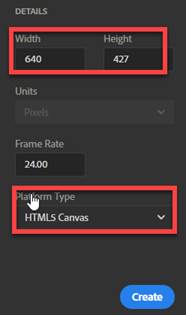
1. Create a
New Animate file in your folder. Select Platform Type “HTML 5
Canvas”. Save the document as Chapter6Part1.fla
2. Modify the document stage size dimension: width:
640px and height: 427px

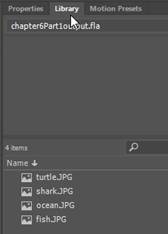
3. Open the Library Panel.
a. From the File Menu, select Windows-> Library
![]()
b. Move and dock the Library Panel beside the Properties tab
Note: All the images you import, will
show up in the Library Panel
4.
Import the bitmap image for the background called ocean.jpg into the Library Panel
a.
From the Main Menu, select Import-> Import to Library

b. Select ocean.jpg
from your Chapter6 images folder. The
road.jpg image will display in the Library Panel

c. Click on the Library Panel tab and
drag the ocean.jpg image on to the Stage in Layer 1
Note: The image will be placed in Layer
1

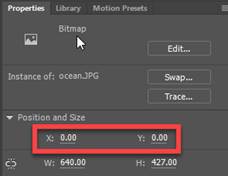
d. Select the ocean.jpg image on the Stage. Go to the Properties Panel, Set the Position
X and Y Coordinate to 0

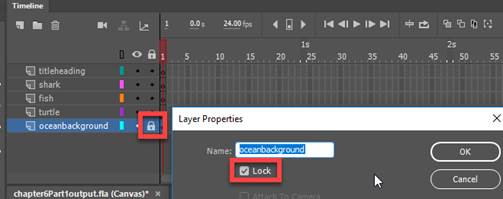
e. Lock the background bottom layer -
layer 1. Click on the lock button.
Note:: You can right click on the Layer, select
Properties and click on Lock
5. Import the
other bitmap images called fish.jpg, shark.jpg and turtle.jpg in the
Library Panel
a. From
the Main Menu, select Import-> Import to Library

b. Select fish.jpg,
shark.jpg and turtle.jpg from your Chapter6
images folder. The road.jpg image will
display in the Library Panel

c. Click on the Library Panel tab and
verify all 4 images are in the Library
6. Add 5 new layers to the timeline
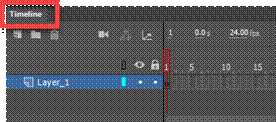
a. Click on the Timeline tab
b. To add layers, click on New Layer button.
You can also go to the Main Menu.
Select Insert->Timeline->Layer

6. Delete the top layer. Select Layer 6 or the top layer. Click on the Trash button

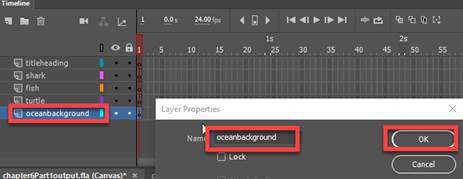
7. Set the layer properties. Name each
layer with a descriptive name.
a. Right click on the Layer and select
Properties.
![]()
b. Add the Name of the Layer and then
click OK.
c. Perform these same steps for all the
5 layers (see below)
Note: You can also double click on the
Layer and add the name
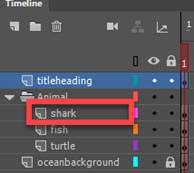
8. Group the layers (turtle, fish and shark) into a folder
a. Select the shark layer
b. Click on New Folder. Note: This will
create a folder right below the titleheading layer

c. Name the folder- Animals. Double click on the folder and add the
name.
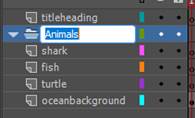
d. Drag the turtle, fish and shark
layers into the Animals Folder

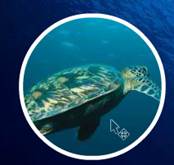
9. In frame 1 of each layer below, create
the bitmap oval fill of the image
a. In the turtle layer frame 1, add the bitmap oval fill for the turtle.jpg
image
Select the turtle layer

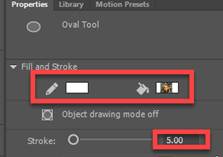
From the Tool bar, click on the Oval Tool button
![]()
In the Properties Panel, select the Stroke to be white and the fill to be the
turtle image; Set the width of the
Stroke
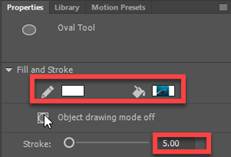
Hold down the shift key while drawing the oval shape.
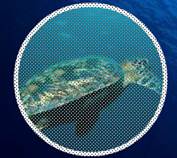
Click on the Selection Tool, and draw a box.
Right click and press <Ctrl><G> or from the Main Menu,
select Modify-Group
![]()
Using the Selection Tool, you can then position the image to the desired
location on the stage.
b. In the fish layer frame 1, add the bitmap oval fill for the fish.jpg image
Select the fish layer

Repeat the step# 9a above to add the
bitmap oval image for the fish
c. In the shark layer frame 1, add the bitmap oval fill for the shark.jpg
image
Select the shark layer
Repeat the step #9a above to add the bitmap oval image for the shark.

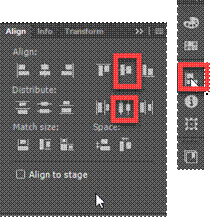
10. Align the oval bitmap images.
a. Hold down the shift key and
select the turtle, fish and shark bitmap oval images.
b. Select Align from the toolbar.
Uncheck the Align to Stage
checkbox.
Click on the Align Vertical Center and
Distribute horizontal Center
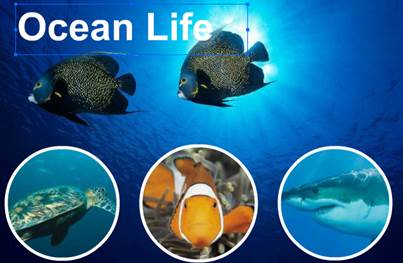
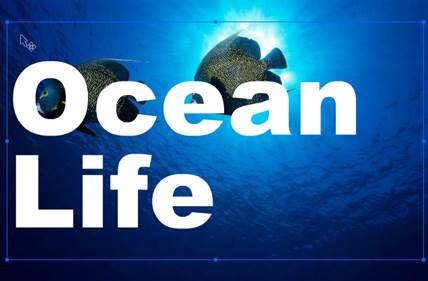
11. Add the title “Ocean Life” to the Title Layer
a. Select the titleheading layer

b. From the Tool bar, select the Text
button
![]()
c. Change the text properties settings
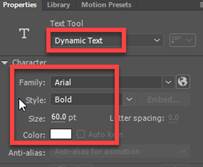
d. Add the text “Ocean Life”. Use the Selection Tool to position the text
box on the Stage
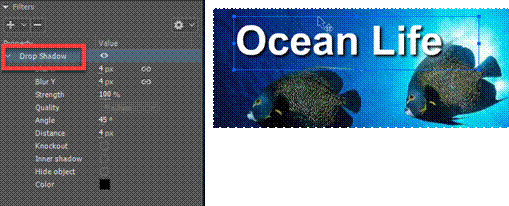
d. Select the “Ocean Life” text box. In the Properties window under Filter, add
Drop Shadow filter
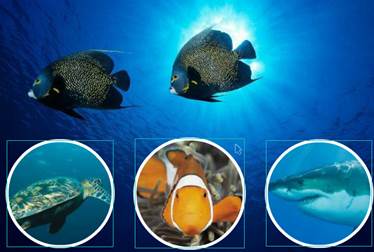
12. Verify
your document has the required objects on the stage. See attached sample of the Flash output
file- Chapter6Part1.html.
13.
Save your Animate file chapter6Part1 in your chapter5 folder.
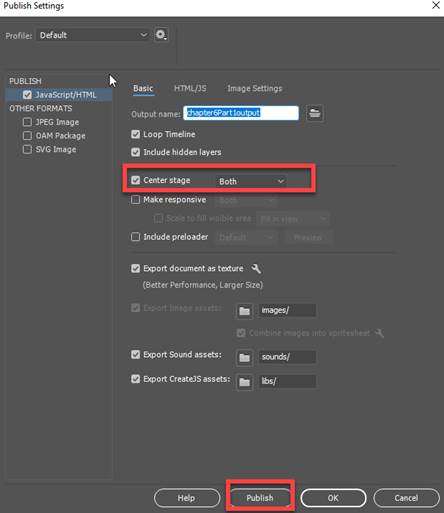
14. Publish your file in JavaScript/HTML format.
From the Main Menu,
select Publish Settings.
Select “Center Stage = Both” only
Click on the Publish button
15. Test Movie. Press
<Ctrl><Enter> or from the Main Menu, select, Control -> Test.
Part 2 Requirements:
1. Create a
New Animate file in your folder. Select Platform Type “HTML 5
Canvas”. Save the document as Chapter6Part2.fla
2. Modify the document stage size dimension: width:
640px and height: 427px
3.
Import the bitmap image for the background called ocean.jpg into the Library Panel
a.
From the Main Menu, select Import-> Import to Library
![]()
b. Select ocean.jpg
from your Chapter6 images folder. The
road.jpg image will display in the Library Panel

c. Click on the Library Panel tab and
drag the ocean.jpg image on to the Stage of Layer 1
Note: The image will be placed in Layer
1

d. Select the ocean.jpg image on the Stage. Go to the Properties Panel, Set the Position
X and Y Coordinate to 0
4. Name Layer 1 to “background”. Right click on Layer_1, select Properties
and then change the name.

5.
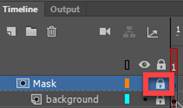
Insert the Mask Layer
a. Insert a new Layer. Name the layer
as Mask

b.
Right click on the layer and select Mask
![]()
c. Unlock the Mask Layer by clicking on the
lock button
6.
In the Mask Layer, add the “Ocean Life” text box
a. Select the Mask Layer
b. From the Tool bar, select the Text
button
![]()
c. Change the text properties setting as
follows:

c. Add the text “Ocean Life”. Use the Selection Tool to position the text
box on the Stage
6. Verify
your document has the required text object on the stage. See attached sample of the Flash output
file- Chapter6Part2.html.
7.
Save your Animate file chapter6Part1 in your chapter5 folder.
8. Publish
your file in JavaScript/HTML format.
From the Main Menu, select Publish
Settings.
Select “Center Stage = Both” only
Click on the Publish button

9. Test Movie. Press <Ctrl><Enter> or from the
Main Menu, select, Control -> Test.
SUBMIT:
1. Submit the screenshot of the output result in
Part 1 step #15 and Part 2 step #9.
On your keyboard, press <Print Screen>
and then paste into a Paint document.
Save the file as a JPG
2. Zip up your Exercise-6 folder containing the
Animate Files
NOTE: Right click on the folder and select Send to
“Compress Folder”. The file will have a
file extension of .zip.
3.. Submit
and upload the screenshots and zipped up compress Exercise-6 folder to the
Canvas Animate Exercise 6 drop box.
|
Chapter 6 Topics |
Points |
|
1. Add and Delete Layers |
3 |
|
2. Set Layer Properties |
2 |
|
3. Add a Guide Layer |
2 |
|
4. Make a Layer Mask |
2 |
|
5. Group Layers into Folders |
2 |
|
6. Show and Hide Layers |
2 |
|
7. Show Layers as Outlines |
2 |
|
8. Lock Layers |
2 |
|
9. Rearrange Layers |
2 |
|
10. Create bitmap oval fill images for the Layers |
10 |
|
Total |
30 |