Animate Lab Exercise #5: Importing
Artwork
Prerequisites:
1. Create
a folder on your desktop called chapter5
2. Detach and unzip the chapter5
image file folder. Place the image file folder inside the chapter5 folder.
Part 1
Requirements:
1. Create a
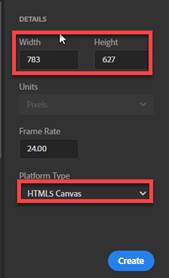
New Animate file in your folder. Select Platform Type “HTML 5
Canvas”. Save the document as Chapter5Part1.fla
2.
Modify the document stage size dimension:
width: 783px and height: 627px
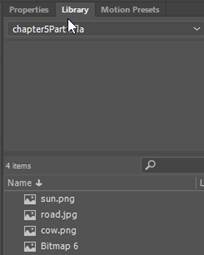
3. Open the Library Panel.
a. From the File Menu, select Windows-> Library
![]()
b. Move and dock the Library Panel beside the Properties tab
Note: All the images you import, will show
up in the Library Panel
4. Import the
bitmap image for the background called road.jpg. Import the image to
the stage
a.
From the Main Menu, select Import-> Import to Stage
![]()
b. Select road.jpg from your Chapter5 images
folder. The road.jpg image will display
on the Stage

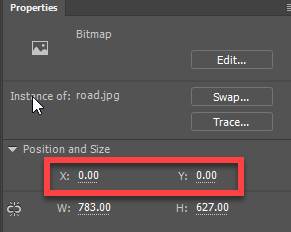
c. To position the road.jpg bitmap image on the
stage.
Click on the Selection Tool button,
select the road.jpg image. Go the Properties tab, Set the X and Y position
coordinate to 0.
![]() \
\
5. Import the bitmap image called cow.png. Import the image to the stage. Resize the images
using the Free Transform Tool.
a.
From the Main Menu, select Import-> Import to Stage
![]()
b. Select cow.png from your
Chapter5 images folder. The cow.png
image will display on the Stage

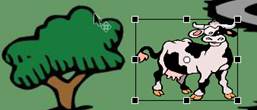
c. Resize the images. Click on the Free Transform Tool button then
select the cow.png image.
Press down the shift key while resizing
the image to retain its proportion. Use
the corner handles to reside.
Click on the Selection Tool button
to position the cow image on the stage
![]()
6. Import the bitmap image called sun.png. Import the image to the Stage. Resize the image
using the Free Transform Tool.
a.
From the Main Menu, select Import-> Import to Stage
![]()
b. Select sun.png from your
Chapter5 images folder. The sun.png
image will display on the Stage
c. Resize the images. Click on the Free Transform Tool button then
select the sun.png image.
Press down the shift key while
resizing the image to retain its proportion.
Use the corner handles to reside.
Click on the Selection Tool button
to position the sun image on the stage
![]()

7. Copy the car image from the
Microsoft Word document
a.
In your chapter5 folder, open the document called cars.doc. This document will launch in Word.
b. Select the image and press
<Ctrl><C> to copy in the clip board.

c. In Animate, press <Ctrl><V> to
paste onto the Stage. You can also
select from the Main Menu, Edit-> Paste Special and select PNG Bitmap.
d.
Resize the images. Click on the
Free Transform Tool button then select the car image.
Press down the shift key while
resizing the image to retain its proportion.
Use the corner handles to reside.
Click on the Selection Tool
button to position the car image on the stage
![]()

8. Verify
your document has the required objects on the stage. See attached sample of the Flash output
file- Chapter5Part1.html.
9. Save your Animate file chapter5Part1 in your chapter5
folder.
10. Publish your file in JavaScript/HTML format.
From the
Main Menu, select Publish Settings.
Select “Center Stage = Both” only
Click on the Publish button

11. Test
Movie. Press <Ctrl><Enter>
or from the Main Menu, select, Control -> Test.
Part 2
Requirements:
1. Create a
New Animate file in your folder. Select Platform Type “HTML 5
Canvas”. Save the document as Chapter5Par2.fla
2.
Modify the document stage size dimension:
width: 731px and height: 469px

3.
Import a Photoshop file called samplefile.psd to the stage
a. From the Main Menu, select
Import-> Import to Stage
![]()
b. Select samplefile.psd
from your Chapter5 images folder.
c. This window will pop-up. Click on the Import button

4. Use the Selection
Tool button to arrange the bitmap image around on the stage
![]()

5. Verify
your document has the required objects on the stage. See attached sample of the Flash output
file- Chapter5Part2.html.
6. Publish
your file in JavaScript/HTML format.
From the Main Menu, select Publish Settings.
Select “Center Stage = Both” only
Click on the Publish button

7. Test
Movie. Press <Ctrl><Enter>
or from the Main Menu, select, Control -> Test.
SUBMIT:
1. Submit the screenshot of the output result in
Part 1 step #11 and Part 2 step #7.
On your keyboard, press <Print
Screen> and then paste into a Paint document. Save the file as a JPG
2. Zip up your Exercise-5 folder containing the
Animate Files
NOTE: Right click on the folder and select Send to
“Compress Folder”. The file will have a
file extension of .zip.
3.. Submit
and upload the screenshots and zipped up compress Exercise-5 folder to the
Canvas Animate Exercise 5 drop box.
|
Chapter 5 Topics |
Points |
|
1. Import Bitmap Images |
10 |
|
2. Break Apart a Bitmap Image |
5 |
|
3. Copy and paste an image from another program |
5 |
|
4.Convert a Bitmap to Vector Art using Trace Bitmap |
5 |
|
5. Import a Photoshop file |
5 |
|
Total |
30 |